

Introduction to Linux

Grzegorz Wolfinger
1. Linux Introduction.
Linux is an open-source operating system that is widely used in various devices, from personal computers to servers and even mobile devices. It was developed as an alternative to proprietary operating systems like Windows or macOS. Linux offers a robust and secure platform with high stability and flexibility. It allows users to customize their system according to their needs and provides access to a vast collection of free and open-source software. Additionally, Linux promotes collaboration and community-driven development, making it a popular choice for many technology enthusiasts and professionals.
Linux's principles:
- Everything is a file (including hardware)
- Small, single-purpose programs
- Ability to chain programs together to perform complex tasks
- Avoid captive user interfaces
- Configuration data stored in text
Why Linux ?
- Open Source.
- Community support.
- Heavily customizable.
- Most Servers runs on Linux.
- DevOps most of the tools implements on Linux only.
- Automation
- Secure.
Some Important Directories:
- Home Directories: /root, /home/username
- User Executables: /bin, /usr/bin, /usr/local/bin
- System Executables: /sbin, /usr/sbin, /usr/local/sbin
- Other Mountpoints: /media, /mnt
- Configuration: /etc
- Temporary Files: /tmp
- Kernels and Bootloader: /boot
- Server Data: /var, /srv
- System Information: /proc, /sys
- Shared Libraries: /lib, /usr/lib, /usr/local/lib
Different Linux distros.
Popular Desktop Linux OS
- Ubuntu Linux
- Linux Mint
- Arch Linux
- Fedora
- Debian
- OpenSuse
Popular Server Linux OS
- Red Hat Enterprise Linux
- Ubuntu Server
- CentOS
- SUSE Enterprise Linux
Most used Linux distros currently in IT industry.
- RPM based:- RHEL & CentOS
- Debian based :- Ubuntu Server
Difference between RPM based and Debian based.
From user’s point of view, there isn’t much difference in these tools. The RPM and DEB formats are both just archive files, with some metadata attached to them. They are both equally arcane, have hard-coded install paths and only differ in subtle details. DEB files are installation files for Debian based distributions. RPM files are installation files for Red Hat based distributions. Ubuntu is based on Debian’s package manage based on APT and DPKG. Red Hat, CentOS and Fedora are based on the old Red Hat Linux package management system, RPM.
2. Basic Commands
Let's open terminal and practice few basics commands.
- Know where you are? Present Working Directory
user@devops:~$ pwd
/home/user
- Create a directory/folder in your home directory
user@devops:~$ mkdir test
user@devops:~$
- Change your current working directory to test(Go to test folder).
user@devops:~$ cd test/
user@devops:~/test$
- Create some more directories and list them with “ls” command.
user@devops:~/test$ mkdir vpdir
user@devops:~/test$ mkdir testdir
user@devops:~/test$ mkdir devopsdir
user@devops:~/test$ ls
devopsdir testdir vpdir
- Create some empty files with “touch” command and list them.
user@devops:~/test$ touch file2 file3 file4
user@devops:~/test$ ls
devopsdir file2 file3 file4 testdir vpdir
- Reconfirm your location in your system.
user@devops:~/test$ pwd
/home/user/test
user@devops:~/test$ ls
devopsdir file2 file3 file4 testdir vpdir
Absolute path and Relative path.
What is a path?
A path is a unique location to a file or a folder in a file system of an OS. A path to a file is a combination of / and alpha-numeric characters.
What is an absolute path?
An absolute path is defined as the specifying the location of a file or directory from the root directory(/). In other words we can say absolute path is a complete path from start of actual filesystem from / directory.
What is the relative path?
Relative path is defined as path related to the present working directory(pwd). Suppose I am located in /home/user and I want to change directory to /home/user/test . I can use relative path concept to change directory to test and also devopsdir directory.
user@devops:~$ pwd
/home/user
user@devops:~$ cd test/
user@devops:~/test$ ls
devopsdir file2 file3 file4 testdir vpdir
user@devops:~/test$ pwd
/home/user/test
user@devops:~/test$ cd devopsdir/
user@devops:~/.../devopsdir$ pwd
/home/user/test/devopsdir
user@devops:~/.../devopsdir$
If you see, all these paths did not start with / directory.
- Creating directories in devopsdir directory with absolute and relative path.
user@devops:~/test$ ls
devopsdir file2 file3 file4 testdir vpdir
user@devops:~/test$ mkdir devopsdir/ansible
user@devops:~/test$ mkdir /home/user/test/devopsdir/aws
user@devops:~/test$ ls devopsdir/
ansible aws
user@devops:~/test$
- Copying files into directory.
user@devops:~/test$ pwd
/home/user/test
user@devops:~/test$ ls
devopsdir file2 file3 file4 testdir vpdir
user@devops:~/test$ cp file2 testdir/
user@devops:~/test$ cd testdir/
user@devops:~/.../testdir$ ls
file2
user@devops:~/.../testdir$
- Copying directories from one location to another.
user@devops:~/test$ pwd
/home/user/test
user@devops:~/test$ ls
devopsdir file2 file3 file4 testdir vpdir
user@devops:~/test$ cp -rvfp testdir/ vpdir/
'testdir/' -> 'vpdir/testdir/'
'testdir/file1' -> 'vpdir/testdir/file1'
user@devops:~/test$ ls vpdir/
testdir
user@devops:~/test$
- Moving files from one location to another.
user@devops:~/test$ pwd
/home/user/test
user@devops:~/test$ ls
devopsdir file2 file3 file4 testdir vpdir
user@devops:~/test$ mv devopsdir/ vpdir/
user@devops:~/test$ ls
file2 file3 file4 testdir vpdir
user@devops:~/test$ ls vpdir/
devopsdir testdir
user@devops:~/test$
user@devops:~/test$ mv file2 file3 vpdir/
user@devops:~/test$ ls
file4 testdir vpdir
- Removing files and directories.
user@devops:~/test$ rm file4
user@devops:~/test$ ls
testdir vpdir
user@devops:~/test$ rm -rftestdir/
user@devops:~/test$ ls
vpdir
3.VIM Editor
Vim is a powerful and customizable text editor for the Linux command line, known for its efficiency and extensive feature set.
It has 3 modes:
- Command Mode
- Insert mode (edit mode)
- Extended command mode
Note: When you open the vim editor, it will be in the command mode by default
Command Mode:
- gg - to go to the beginning of the page
- G - to go to end of the page
- w - to move the cursor forward, word by word
- b - to move the cursor backward, word by word
- nw - to move the cursor forward to n words (SW)
- nb - to move the cursor backward to n words (SB)
- u - to undo last change (word)
- U - to undo the previous changes
- ctrl+r - to redo the changes
- yy - to copy a line
- nyy - to copy n lines
- p - to paste line below the cursor position
- P - to paste line above the cursor position
- dw - to delete the word letter by letter (like Backspace)
- x - to delete the word letter by letter (like DEL key)
- dd - to delete entire line
- ndd - to delete n no. of lines from cursor position
- / - to search a word in the file
Extended Mode: (Colon Mode)
Extended Mode is used for save and quit or save without quit using "Esc" Key with":"
- :w - to save the changes
- :q - to quit(without saving)
- :wq - to save and quit
- :w! - to save forcefully
- :wq! - to save and quit forcefully
- :x - to save and quit
- :se nu - to set the line numbers to the file
- :se nonu - to remove the set line numbers
ls command options:
- -l - Long listing format of files and directories, one per line
- -a - List all hidden files and directories started with '.'
- -F - Add a '/' classification at the end of each Directory
- -g - List all files and directories with the group name
- -i - Print index number of each file and directories
- -m - List all files and directories separated by comma ','
- -n - List numeric UID and GID of Owner and Groups
- -r - List all files and directories in reverse order
- -R - Short list all directories
- -t - Sorted by modified time, started with the newest file
Types of files in Linux.
- Regular file - : Normal files such as text, data
- Directory d : Files that are lists of the other files
- Symbolic Link l : A shortcut that points to the location of the actual file
- Special file c : Mechanism used for input and output, such as files in /dev
- Socket s : A special file that provides inter-process networking protected by the file system's access control
- Pipe p : A special file that allows processes to communicate with each other without using network socket semantics
- Block Special b : Represent device files such as hard drives, monitors, etc.
Examples of file types:
[root@centos9 ~]# ls -l
total 8
-rw-------. 1 root root 2027 Oct  1 15:43 anaconda-ks.cfg
lrwxrwxrwx. 1 root root   36 Oct  1 16:32 cmds -> /opt/dev/ops/devops/text/command.txt
drwxr-xr-x. 2 root root    6 Oct  1 15:53 devopsdir
-rw-------. 1 root root 1388 Sep 18 17:30 original-ks.cfg
[root@centos9 ~]#
More examples
crw-r-----. 1 root kmem      1,   4 Oct  1 15:46 port
crw-------. 1 root root    108,   0 Oct  1 15:46 ppp
crw-rw-rw-. 1 root tty       5,   2 Oct  1 17:36 ptmx
drwxr-xr-x. 2 root root           0 Oct  1 15:46 pts
crw-rw-rw-. 1 root root      1,   8 Oct  1 15:46 random
crw-rw-r--. 1 root root     10, 242 Oct  1 15:46 rfkill
lrwxrwxrwx. 1 root root           4 Oct  1 15:46 rtc -> rtc0
crw-------. 1 root root    250,   0 Oct  1 15:46 rtc0
brw-rw----. 1 root disk      8,   0 Oct  1 15:46 sda
brw-rw----. 1 root disk      8,   1 Oct  1 15:46 sda1
brw-rw----. 1 root disk      8,   2 Oct  1 15:46 sda2
brw-rw----. 1 root disk      8,   3 Oct  1 15:46 sda3
crw-rw----. 1 root disk     21,   0 Oct  1 15:46 sg0
drwxrwxrwt. 2 root root          40 Oct  1 15:46 shm
crw-------. 1 root root     10, 231 Oct  1 15:46 snapshot
drwxr-xr-x. 2 root root          80 Oct  1 15:46 snd
lrwxrwxrwx. 1 root root          15 Oct  1 15:46 stderr -> /proc/self/fd/2
lrwxrwxrwx. 1 root root          15 Oct  1 15:46 stdin -> /proc/self/fd/0
lrwxrwxrwx. 1 root root          15 Oct  1 15:46 stdout -> /proc/self/fd/1
crw-rw-rw-. 1 root tty       5,   0 Oct  1 15:46 tty
crw--w----. 1 root tty       4,   0 Oct  1 15:46 tty0
Symbolic links
Symbolic links are like desktop shortcuts we use in windows. Create a soft link for /var/log directory in our current working directory.
Example of creating a link:
[root@centos9 ~]# mkdir /opts/devs/devops/test
mkdir: cannot create directory ‘/opts/devs/devops/test’: No such file or directory
[root@centos9 ~]# mkdir -p /opts/devs/devops/test
[root@centos9 ~]# vim /opts/devs/devops/test/command.txt
[root@centos9 ~]# ln -s /opts/devs/devops/test/command.txt /home/vagrant/cmds
[root@centos9 ~]# ls
anaconda-ks.cfg  cmds  devopsdir  original-ks.cfg
[root@centos9 ~]# cat cmds
ls
pwd
mkdir
cp
mv
rm
[root@centos9 ~]#
Removing a link:
[root@centos9 ~]# ls -l
total 8
-rw-------. 1 root root 2027 Oct  1 15:43 anaconda-ks.cfg
lrwxrwxrwx. 1 root root   36 Oct  1 16:32 cmds -> /opt/dev/ops/devops/text/command.txt
drwxr-xr-x. 2 root root    6 Oct  1 15:53 devopsdir
-rw-------. 1 root root 1388 Sep 18 17:30 original-ks.cfg
// removing a link
[root@centos9 ~]# unlink cmds
[root@centos9 ~]# ls -l
total 8
-rw-------. 1 root root 2027 Oct  1 15:43 anaconda-ks.cfg
drwxr-xr-x. 2 root root    6 Oct  1 15:53 devopsdir
-rw-------. 1 root root 1388 Sep 18 17:30 original-ks.cfg
[root@centos9 ~]# [root@centos9 ~]# ls -l
4. Filter & I/O redirection command.
Grep Command
- Grep command is used to find texts from any text input
Let's look for firewall inside anaconda-ks.cfg file:
[root@centos9 ~]# ls
anaconda-ks.cfg  devopsdir  original-ks.cfg
[root@centos9 ~]# grep firewall anaconda-ks.cfg
firewall --disabled
Linux is case-sensitive, if we look for Firewall we can get different result:
[root@centos9 ~]# grep Firewall anaconda-ks.cfg
# Firewall configuration
[root@centos9 ~]#
We can ignore case in grep with -i option :
[root@centos9 ~]# grep -i firewall anaconda-ks.cfg
fireWall is off in this machine
# Firewall configuration
firewall --disabled
[root@centos9 ~]#
If we don't know where exactly is a word we are looking for. We can use * to search everywhere in the current working directory :
[root@centos9 ~]# grep -i firewall *
anaconda-ks.cfg:fireWall is off in this machine
anaconda-ks.cfg:# Firewall configuration
anaconda-ks.cfg:firewall --disabled
grep: devopsdir: Is a directory
original-ks.cfg:firewall --disabled
[root@centos9 ~]#
As you can see it found all except inside a devopsdir directory, If we want to also search inside directories we can add option R :
[root@centos9 ~]# grep -iR firewall *
anaconda-ks.cfg:fireWall is off in this machine
anaconda-ks.cfg:# Firewall configuration
anaconda-ks.cfg:firewall --disabled
devopsdir/anaconda-ks.cfg:fireWall is off in this machine
devopsdir/anaconda-ks.cfg:# Firewall configuration
devopsdir/anaconda-ks.cfg:firewall --disabled
devopsdir/mybootingfile.cfg:fireWall is off in this machine
devopsdir/mybootingfile.cfg:# Firewall configuration
devopsdir/mybootingfile.cfg:firewall --disabled
original-ks.cfg:firewall --disabled
Sometimes we're looking for a setting like SELINUX for example, and we only know that is somewhere inside /etc/ then we can use grep with R option and search whole /etc/ directory:
[root@centos9 ~]# grep -R SELINUX /etc/*
/etc/selinux/config:# SELINUX= can take one of these three values:
/etc/selinux/config:# NOTE: In earlier Fedora kernel builds, SELINUX=disabled would also
/etc/selinux/config:SELINUX=permissive
/etc/selinux/config:# SELINUXTYPE= can take one of these three values:
/etc/selinux/config:SELINUXTYPE=targeted
/etc/selinux/targeted/contexts/x_contexts:property _SELINUX_*                   system_u:object_r:seclabel_xproperty_t:s0
/etc/selinux/.config_backup:# BACKUP_SELINUX= can take one of these three values:
/etc/selinux/.config_backup:# NOTE: In earlier Fedora kernel builds, BACKUP_SELINUX=disabled would also
/etc/selinux/.config_backup:BACKUP_SELINUX=permissive
/etc/selinux/.config_backup:# BACKUP_SELINUXTYPE= can take one of these three values:
/etc/selinux/.config_backup:BACKUP_SELINUXTYPE=targeted
/etc/sysconfig/selinux:# SELINUX= can take one of these three values:
/etc/sysconfig/selinux:# NOTE: In earlier Fedora kernel builds, SELINUX=disabled would also
/etc/sysconfig/selinux:SELINUX=permissive
/etc/sysconfig/selinux:# SELINUXTYPE= can take one of these three values:
/etc/sysconfig/selinux:SELINUXTYPE=targeted
We can also use grep with -v option to display things except the given word and let's add -i for case-senstive :
[root@centos9 ~]# grep -vi firewall anaconda-ks.cfg
# Generated by Anaconda 34.25.0.23
# Generated by pykickstart v3.32
#version=RHEL9
# License agreement
eula --agreed
# Reboot after installation
reboot
# Use text mode install
...
and we got the whole content of that file without the word firewall
Less and More Commands
The both are used to read a file similar to cat, but cat is displaying a content and just quits. Less and more are readers, and you can read a file you can also search with / and quit any time with q. Less you can use up, down arrows, as for more command you cannot use up arrow, down arrow you have to use enter. It's going to show you file in the percentage way also you quit with q.
Note:
- Press Enter key to scroll down line by line
- use d to go to next page
- use b to go to previous page
- use / to search for a word in the file
- use v to go vim mode where you can edit the file once you save it, you will back to less command.
Head and tail commands
- head it is used to display the top first 10 lines of the file
- tail it is used to display the last 10 lines of the file
They both will show 10 lines by default, but you can give the option of how many lines you want to display.
[root@centos9 ~]# head anaconda-ks.cfg
# Generated by Anaconda 34.25.0.23
# Generated by pykickstart v3.32
#version=RHEL9
# License agreement
eula --agreed
# Reboot after installation
reboot
# Use text mode install
text
repo --name="AppStream" --baseurl=file:///run/install/repo/AppStream
[root@centos9 ~]# ^C
or 4 lines
[root@centos9 ~]# head -4 anaconda-ks.cfg
# Generated by Anaconda 34.25.0.23
# Generated by pykickstart v3.32
#version=RHEL9
# License agreement
[root@centos9 ~]#
display last 20 lines with tail command:
[root@centos9 ~]# tail -20 anaconda-ks.cfg
# Generated using Blivet version 3.4.0
ignoredisk --only-use=sda
# System bootloader configuration
bootloader --append="no_timer_check console=tty0 console=ttyS0,115200n8 elevator=noop" --location=mbr --boot-drive=sda
# Clear the Master Boot Record
zerombr
# Partition clearing information
clearpart --all --initlabel
# Disk partitioning information
part swap --fstype="swap" --size=1024
part /boot --fstype="xfs" --size=1024
part / --fstype="xfs" --size=79871

# System timezone
timezone UTC

# Root password
rootpw --plaintext vagrant
user --name=vagrant --password=vagrant

[root@centos9 ~]#
Now, tail has also one very useful option, -f, and you give a file path it will show you the dynamic content. So if any changes happen in this file, it's going to show us on a screen, which is good when we read log files.
[root@centos9 log]# tail -f messages
Oct  2 14:38:23 centos9 systemd[1]: dnf-makecache.service: Main process exited, code=exited, status=1/FAILURE
Oct  2 14:38:23 centos9 systemd[1]: dnf-makecache.service: Failed with result 'exit-code'.
Oct  2 14:38:23 centos9 systemd[1]: Failed to start dnf makecache.
Oct  2 15:52:21 centos9 systemd[1]: Starting dnf makecache...
Oct  2 15:52:21 centos9 dnf[5200]: Metadata cache refreshed recently.
Oct  2 15:52:21 centos9 systemd[1]: dnf-makecache.service: Deactivated successfully.
Oct  2 15:52:21 centos9 systemd[1]: Finished dnf makecache.


//
// here is the log of new user that login to our system
//
Oct  2 16:12:23 centos9 systemd-logind[533]: New session 6 of user vagrant.
Oct  2 16:12:23 centos9 systemd[1]: Started Session 6 of User vagrant.
Oct  2 16:12:23 centos9 systemd[1]: Starting Hostname Service...
Oct  2 16:12:23 centos9 systemd[1]: Started Hostname Service.
Oct  2 16:12:53 centos9 systemd[1]: systemd-hostnamed.service: Deactivated successfully.
So that's how the tail -f option is very helpful. When you're troubleshooting one very important tip about troubleshooting a server, you see errors in log files. That's how you start troubleshooting.
Passwd file: stores information about all the users in the system
[root@centos9 ~]# cat /etc/passwd
root:x:0:0:root:/root:/bin/bash
bin:x:1:1:bin:/bin:/sbin/nologin
daemon:x:2:2:daemon:/sbin:/sbin/nologin
adm:x:3:4:adm:/var/adm:/sbin/nologin
lp:x:4:7:lp:/var/spool/lpd:/sbin/nologin
sync:x:5:0:sync:/sbin:/bin/sync
shutdown:x:6:0:shutdown:/sbin:/sbin/shutdown
halt:x:7:0:halt:/sbin:/sbin/halt
mail:x:8:12:mail:/var/spool/mail:/sbin/nologin
operator:x:11:0:operator:/root:/sbin/nologin
games:x:12:100:games:/usr/games:/sbin/nologin
ftp:x:14:50:FTP User:/var/ftp:/sbin/nologin
nobody:x:65534:65534:Kernel Overflow User:/:/sbin/nologin
unbound:x:999:999:Unbound DNS resolver:/etc/unbound:/sbin/nologin
systemd-coredump:x:998:996:systemd Core Dumper:/:/sbin/nologin
dbus:x:81:81:System message bus:/:/sbin/nologin
polkitd:x:997:995:User for polkitd:/:/sbin/nologin
libstoragemgmt:x:996:992:daemon account for libstoragemgmt:/var/run/lsm:/sbin/nologin
cockpit-ws:x:995:991:User for cockpit web service:/nonexisting:/sbin/nologin
cockpit-wsinstance:x:994:990:User for cockpit-ws instances:/nonexisting:/sbin/nologin
tss:x:59:59:Account used for TPM access:/dev/null:/sbin/nologin
sssd:x:993:989:User for sssd:/:/sbin/nologin
setroubleshoot:x:992:988::/var/lib/setroubleshoot:/sbin/nologin
sshd:x:74:74:Privilege-separated SSH:/usr/share/empty.sshd:/sbin/nologin
chrony:x:991:987::/var/lib/chrony:/sbin/nologin
tcpdump:x:72:72::/:/sbin/nologin
systemd-oom:x:985:985:systemd Userspace OOM Killer:/:/usr/sbin/nologin
systemd-resolve:x:984:984:systemd Resolver:/:/usr/sbin/nologin
vagrant:x:1000:1000::/home/vagrant:/bin/bash
vboxadd:x:983:1::/var/run/vboxadd:/bin/false
[root@centos9 ~]#
Let's say we want to only get just the usernames or maybe just the user. This file is segregated into rows and columns, it's properly segregated by using colon's and if you have that proper separators or proper delimiters like colon or comma or anything, then you use cut command.
Cut command.
-
cut -d -f filename (where d stands for delimiter ex. :," " etc. and f stands for field )
- to delimit spaces and print field # cut -d " " -f1 filename
[root@centos9 ~]# cut -d: -f1 /etc/passwd
root
bin
daemon
adm
lp
sync
shutdown
halt
mail
operator
games
ftp
nobody
unbound
systemd-coredump
dbus
polkitd
libstoragemgmt
cockpit-ws
cockpit-wsinstance
tss
sssd
setroubleshoot
sshd
chrony
tcpdump
systemd-oom
systemd-resolve
vagrant
vboxadd
[root@centos9 ~]#
This is good only if you have proper separator like in out example - colon. But if you don't have a proper separator, then there's an intelligent filter tool called awk
Awk command
Awk command has a lot of options. You can use all your regular expressions, all your filtering techniques, and you can use awk command to apply all those filtering techniques using regular expressions.
One simple example as cut , getting the first column:
[root@centos9 ~]# awk -F':' '{print $1}' /etc/passwd
root
bin
daemon
adm
lp
sync
shutdown
halt
mail
operator
games
ftp
nobody
unbound
systemd-coredump
dbus
polkitd
libstoragemgmt
cockpit-ws
cockpit-wsinstance
tss
sssd
setroubleshoot
sshd
chrony
tcpdump
systemd-oom
systemd-resolve
vagrant
vboxadd
[root@centos9 ~]#
Now, this may look more complicated than cut, but sometimes for some advanced search or intelligent search, awk is always better.
Sed command
Sed stands for stream editor, which is used to search a word in the file and replace it with the word required to be in the output
[root@centos9 ~]# cat samplefile.txt
Welcome to Kernel Tech
[root@centos9 ~]#
[root@centos9 ~]# sed 's/Tech/Technologies/g' samplefile.txt
Welcome to Kernel Technologies
[root@centos9 ~]# cat samplefile.txt
Welcome to Kernel Tech
[root@centos9 ~]#
Note: it will only modify the output, but there will be no change in the original file. It's safer to see first what we're changing. But if you want to change it and you sure about it, then you can use -i option.
[root@centos9 ~]# sed -i 's/Tech/Technologies/g' samplefile.txt
[root@centos9 ~]# cat samplefile.txt
Welcome to Kernel Technologies
[root@centos9 ~]#
I/O redirection.
Redirection is a process where we can copy the output of any command(s), file(s) into a new file. There are two ways of redirecting the output into a file. Using > or >> filename after the command. The only difference is that > will overwrite the content of that file, but >> will append output to that file.
Example of redirection, I created info link that point to /tmp/sysinfo.txt
[root@centos9 ~]# echo "hello world"
hello world
[root@centos9 ~]# echo "####################################" > info
[root@centos9 ~]# cat info
####################################
[root@centos9 ~]# date > info
[root@centos9 ~]# cat info
Mon Oct  2 05:31:11 PM UTC 2023
[root@centos9 ~]# echo "####################################" >> info
[root@centos9 ~]# cat info
Mon Oct  2 05:31:11 PM UTC 2023
####################################
[root@centos9 ~]# uptime >> info
[root@centos9 ~]# echo "####################################" >> info
[root@centos9 ~]# free -m >> info
[root@centos9 ~]# echo "####################################" >> info
[root@centos9 ~]# df -h >> info
[root@centos9 ~]# cat info
Mon Oct  2 05:31:11 PM UTC 2023
####################################
 17:32:47 up  3:54,  2 users,  load average: 0.00, 0.00, 0.00
####################################
               total        used        free      shared  buff/cache   available
Mem:             757         272         343           2         266         484
Swap:           1023           0        1023
####################################
Filesystem      Size  Used Avail Use% Mounted on
devtmpfs        4.0M     0  4.0M   0% /dev
tmpfs           379M     0  379M   0% /dev/shm
tmpfs           152M  3.0M  149M   2% /run
/dev/sda2        78G  2.1G   76G   3% /
/dev/sda1      1014M  237M  778M  24% /boot
tmpfs            76M     0   76M   0% /run/user/1000
[root@centos9 ~]#
Sometimes you don't want to see output, not on the screen, not in any file, then you can redirect the output to somewhere else, which is /dev/null.
[root@centos9 ~]# uptime > /dev/null
[root@centos9 ~]# cat /dev/null
[root@centos9 ~]#
/dev/null is like a black hole there is nothing there so what ever it's redirected to /dev/null is gone. We can use it as a trick to quickly wipe the info content:
anaconda-ks.cfg  devopsdir  info  original-ks.cfg  samplefile.txt
[root@centos9 ~]# cat info
Mon Oct  2 05:31:11 PM UTC 2023
####################################
 17:32:47 up  3:54,  2 users,  load average: 0.00, 0.00, 0.00
####################################
               total        used        free      shared  buff/cache   available
Mem:             757         272         343           2         266         484
Swap:           1023           0        1023
####################################
Filesystem      Size  Used Avail Use% Mounted on
devtmpfs        4.0M     0  4.0M   0% /dev
tmpfs           379M     0  379M   0% /dev/shm
tmpfs           152M  3.0M  149M   2% /run
/dev/sda2        78G  2.1G   76G   3% /
/dev/sda1      1014M  237M  778M  24% /boot
tmpfs            76M     0   76M   0% /run/user/1000
[root@centos9 ~]# cat /dev/null > info
[root@centos9 ~]# cat info
[root@centos9 ~]#
Ok, so that's redirecting standard output, but you get errors sometimes.
[root@centos9 ~]# free -m > /dev/null
[root@centos9 ~]# freeee -m > /dev/null
-bash: freeee: command not found
[root@centos9 ~]# freeee -m 2>> /tmp/error.log
[root@centos9 ~]# cat /tmp/error.log
-bash: freeee: command not found
[root@centos9 ~]#
- Redirecting only standard output to a file "1>>" this is default ">>"
- Redirecting only errors to a file "2>>"
- Redirecting all the output to a file "&>>"
[root@centos9 ~]# free -m 1>> /tmp/error.log
[root@centos9 ~]# cat /tmp/error.log
-bash: freeee: command not found
               total        used        free      shared  buff/cache   available
Mem:             757         245         262           2         374         511
Swap:           1023           0        1023
[root@centos9 ~]# free -m &>> /tmp/error.log
[root@centos9 ~]# fredadasdae -m &>> /tmp/error.log
[root@centos9 ~]# cat /tmp/error.log
-bash: freeee: command not found
               total        used        free      shared  buff/cache   available
Mem:             757         245         262           2         374         511
Swap:           1023           0        1023
               total        used        free      shared  buff/cache   available
Mem:             757         245         262           2         374         511
Swap:           1023           0        1023
-bash: fredadasdae: command not found
[root@centos9 ~]#
Piping
So far we've dealt with sending data to and from files. Now we'll take a look at a mechanism for sending data from one program to another. It's called piping and the operator we use is ( | ). What this operator does is feed the output from the program on the left as input to the program on the right.
Let's say you want to count how many lines is in /etc/passwd file. you can run a command wc -l:
[root@centos9 ~]# wc -l /etc/passwd
30 /etc/passwd
Now, you want to know, how many files there is in /etc/. You can use a nice trick using piping:
[root@centos9 ~]# cd /etc/
[root@centos9 etc]# ls | wc -l
187
[root@centos9 etc]#
Or you want to search for a file name that start with host :
[root@centos9 etc]# ls | grep host
host.conf
hostname
hosts
[root@centos9 etc]#
Let's search if vagrant word is in last 20 lines of /var/log/messages file:
[root@centos9 etc]# tail -20 /var/log/messages | grep -i vagrant
Oct  2 16:12:23 centos9 systemd-logind[533]: New session 6 of user vagrant.
Oct  2 16:12:23 centos9 systemd[1]: Started Session 6 of User vagrant.
[root@centos9 etc]#
Few more examples for piping :
- only show Mem:
[root@centos9 etc]# free -m
               total        used        free      shared  buff/cache   available
Mem:             757         247         261           2         374         510
Swap:           1023           0        1023
[root@centos9 etc]# free -m | grep Mem
Mem:             757         247         261           2         374         510
[root@centos9 etc]#
- first 10 files
[root@centos9 etc]# ls -l | head
total 1168
-rw-r--r--. 1 root root       18 Sep 18 17:28 adjtime
-rw-r--r--. 1 root root     1529 Jun 23  2020 aliases
drwxr-xr-x. 2 root root     4096 Sep 18 17:38 alternatives
-rw-r--r--. 1 root root      541 Jul 11  2022 anacrontab
-rw-r--r--. 1 root root        1 Apr  4  2022 at.deny
drwxr-x---. 4 root root      100 Sep 18 17:37 audit
drwxr-xr-x. 3 root root     4096 Sep 18 17:40 authselect
drwxr-xr-x. 2 root root      108 Sep 18 17:39 bash_completion.d
-rw-r--r--. 1 root root     2658 Dec 21  2022 bashrc
[root@centos9 etc]# ^C
- last 10 files
[root@centos9 etc]# ls -l | tail
-rw-r--r--. 1 root root     4017 Feb  9  2023 vimrc
-rw-r--r--. 1 root root     1184 Feb  9  2023 virc
-rw-r--r--. 1 root root     4925 Nov  3  2021 wgetrc
drwxr-xr-x. 6 root root       70 Sep 18 17:20 X11
-rw-r--r--. 1 root root      817 Aug  9  2021 xattr.conf
drwxr-xr-x. 4 root root       38 Sep 18 17:20 xdg
drwxr-xr-x. 2 root root       29 Sep 18 17:47 xml
drwxr-xr-x. 2 root root       57 Sep 18 17:38 yum
lrwxrwxrwx. 1 root root       12 Jun 29 08:27 yum.conf -> dnf/dnf.conf
drwxr-xr-x. 2 root root       51 Sep  5 14:36 yum.repos.d
[root@centos9 etc]#
Find command
Find command is used to find the files or directory's path, it is exactly like the find option in windows where you can search for a file.
Options that can be used with find command:
- name : For searching a file with its name
- inum : For searching a file with particular inode number
- type : For searching a particular type of file
- user : For files whose owner is a particular user
- group : For files belonging to particular group
find by -name
[root@centos9 ~]# find /etc -name host*
/etc/host.conf
/etc/hosts
/etc/hostname
[root@centos9 ~]#
find by -type
[root@centos9 ~]# find /etc -type l
/etc/mtab
/etc/crypto-policies/back-ends/bind.config
/etc/crypto-policies/back-ends/gnutls.config
/etc/crypto-policies/back-ends/java.config
/etc/crypto-policies/back-ends/javasystem.config
/etc/crypto-policies/back-ends/krb5.config
/etc/crypto-policies/back-ends/libreswan.config
/etc/crypto-policies/back-ends/libssh.config
/etc/crypto-policies/back-ends/nss.config
/etc/crypto-policies/back-ends/openssh.config
/etc/crypto-policies/back-ends/opensshserver.config
/etc/crypto-policies/back-ends/openssl.config
/etc/crypto-policies/back-ends/opensslcnf.config
/etc/crypto-policies/back-ends/openssl_fips.config
/etc/fonts/conf.d/20-unhint-small-dejavu-sans.conf
/etc/fonts/conf.d/57-dejavu-sans-fonts.conf
/etc/fonts/conf.d/31-cantarell.conf
/etc/fonts/conf.d/61-adobe-source-code-pro.conf
/etc/pki/tls/certs/ca-bundle.crt
/etc/pki/tls/certs/ca-bundle.trust.crt
/etc/pki/tls/cert.pem
...
[root@centos9 ~]#
We can also search at the root level, which is searching the entire operating system, but this may slow down our operating system. I do not recommend making search the root dir because this is a real time search.
[root@centos9 ~]# find / -name host*
Locate command
This is a package that might need to be installed if not present in your system. It's also used for searching:
yum install mlocate -y
After installation, we can use it like that:
[root@centos9 ~]# updatedb
[root@centos9 ~]# locate host
/dev/vhost-net
/dev/vhost-vsock
/etc/host.conf
/etc/hostname
/etc/hosts
/etc/samba/lmhosts
/etc/ssh/ssh_host_ecdsa_key
/etc/ssh/ssh_host_ecdsa_key.pub
/etc/ssh/ssh_host_ed25519_key
/etc/ssh/ssh_host_ed25519_key.pub
/etc/ssh/ssh_host_rsa_key
/etc/ssh/ssh_host_rsa_key.pub
/usr/bin/host
/usr/bin/hostid
...
[root@centos9 ~]#
It's not a real-time search, so even if you happen to delete some file, it will still be showing it if as long as you don't run updatedb command. So before you run the locate command, run updateddb, so you get right path or the existing data.
5. Users & Groups.
Important points related to users:
- Users and groups are used to control access to files and resources
- Users login to the system by supplying their username and password
- Every file on the system is owned by a user and associated with a group
- Every process has an owner and group affiliation, and can only access the resources its owner or group can access.
- Every user of the system is assigned a unique use ID number (UID)
- Users name and UID are stored in /etc/passwd
- User's password is stored in /etc/shadow in encrypted form.
- Users are assigned a home directory and a program that is run when they log in (Usually a shell)
- Users cannot read, write or execute each other's files without permission.
Types of user:
In Linux there are three types of users.
- Superuser or root user - superuser or root user is the most powerful user. He is the administrator user.
- Systems user - system users are the users created by the softwares or applications. For example if we install Apache it will create a user apache. These kinds of users are known as system users.
- Normal user - normal user are the users created by root user. They are normal users like Greg, John etc. Only root user has the permission to create or remove a user.
Whenever a user is created in Linux, things are created by default:
- A home directory - /home/username
- A mailbox - /var/spool/mail
- Unique UID & GID are given to user
Passwd file
/etc/passwd
[root@centos9 ~]# head -2 /etc/passwd
root:x:0:0:root:/root:/bin/bash
bin:x:1:1:bin:/bin:/sbin/nologin
[root@centos9 ~]#
The above fields are:
- root=name
- x=link to password file i.e. /etc/shadow
- 0 or 1 = UID (user id)
- 0 or 1 = GID (group id)
- root or bin = comment (brief information about the user)
- /root or /bin = home directory of the user
- /bin/bash or /sbin/nologin = shell
Group file
/etc/group
The file /etc/group stores group information. Each line in this file stores one group entry:
- group name
- group password
- GID
- group members
[root@centos9 ~]# head -2 /etc/group
root:x:0:
bin:x:1:
[root@centos9 ~]#
Add user, set password and switch to user
If you logged in as a root user, you can add new user assign a new password for that user, and log in as that user without entering a password.
[root@centos9 ~]# whoami
root
[root@centos9 ~]# useradd aws
[root@centos9 ~]# passwd aws
Changing password for user aws.
New password:
Retype new password:
passwd: all authentication tokens updated successfully.
[root@centos9 ~]# su - aws
[aws@centos9 ~]$ id
uid=1003(aws) gid=1003(aws) groups=1003(aws) context=unconfined_u:unconfined_r:unconfined_t:s0-s0:c0.c1023
[aws@centos9 ~]$
Lets login in as a aws user and lets try to add new user:
[root@centos9 ~]# su - aws
Last login: Tue Oct  3 12:17:05 UTC 2023 on pts/0
[aws@centos9 ~]$ useradd jenkins
useradd: Permission denied.
useradd: cannot lock /etc/passwd; try again later.
[aws@centos9 ~]$
Like you can see permission denied. In order to add or delete a user you need to be a root user :
[aws@centos9 ~]$ exit
logout
[root@centos9 ~]# whoami
root
[root@centos9 ~]# useradd jenkins
[root@centos9 ~]# passwd
Changing password for user root.
New password:
Retype new password:
passwd: all authentication tokens updated successfully.
[root@centos9 ~]#
Let's log in as aws which is a normal user and then try to log in as jenkins user and see what happens. Remember when you are a root user you can log in to every account without entering a password.
[aws@centos9 ~]$ whoami
aws
[aws@centos9 ~]$ pwd
/home/aws
[aws@centos9 ~]$ id
uid=1003(aws) gid=1003(aws) groups=1003(aws) context=unconfined_u:unconfined_r:unconfined_t:s0-s0:c0.c1023
[aws@centos9 ~]$ su - jenkins
Password:
su: Authentication failure
[aws@centos9 ~]$
And we got authentication failure, as a normal user we need to enter a password if we want to log in to another user account. Let's try one more time this time we will enter a valid password:
[aws@centos9 ~]$ su - jenkins
Password:
Last failed login: Tue Oct  3 12:31:15 UTC 2023 on pts/0
There were 1 failed login attempt since the last successful login.
[jenkins@centos9 ~]$ whoami
jenkins
[jenkins@centos9 ~]$ id
uid=1004(jenkins) gid=1005(jenkins) groups=1005(jenkins) context=unconfined_u:unconfined_r:unconfined_t:s0-s0:c0.c1023
[jenkins@centos9 ~]$
This time we successfully log in, there is also message about 1 failed login attempt.
Now let's go back to root user and quickly delete a user, and if we use -r option it will also remove home dir:
[jenkins@centos9 ~]$ exit
logout
[aws@centos9 ~]$ exit
logout
[root@centos9 ~]# userdel -r jenkins
[root@centos9 ~]# id jenkins
id: ‘jenkins’: no such user
[root@centos9 ~]# tail -4 /etc/passwd
vagrant:x:1000:1000::/home/vagrant:/bin/bash
vboxadd:x:983:1::/var/run/vboxadd:/bin/false
ansible:x:1001:1001::/home/ansible:/bin/bash
aws:x:1003:1003::/home/aws:/bin/bash
[root@centos9 ~]#
Jenkins is gone, but as a root user we can also add groups, add users to the groups and delete groups. Let's see all of that now. I want to check the last 10 groups and add new devops group:
[root@centos9 ~]# tail /etc/group
chrony:x:987:
slocate:x:21:
tcpdump:x:72:
sgx:x:986:
systemd-oom:x:985:
systemd-resolve:x:984:
vagrant:x:1000:
vboxsf:x:983:
ansible:x:1001:
aws:x:1003:
[root@centos9 ~]#
[root@centos9 ~]# groupadd devops
[root@centos9 ~]# grep devops /etc/group
devops:x:1004:
[root@centos9 ~]# tail -4 /etc/group
vboxsf:x:983:
ansible:x:1001:
aws:x:1003:
devops:x:1004:
[root@centos9 ~]#
As you can see, we created new group, let'd add aws user to our new devops group:
[root@centos9 ~]# id aws
uid=1003(aws) gid=1003(aws) groups=1003(aws)
[root@centos9 ~]# usermod -G devops aws
[root@centos9 ~]# id aws
uid=1003(aws) gid=1003(aws) groups=1003(aws),1004(devops)
[root@centos9 ~]# grep aws /etc/group
aws:x:1003:
devops:x:1004:aws
[root@centos9 ~]#
Now aws user belongs into two groups. Note that we used -G option, which add user to secondary group. We can use -g option if we want to add/change user primary group. Example for that:
[root@centos9 ~]# id aws
uid=1003(aws) gid=1003(aws) groups=1003(aws),1004(devops)
[root@centos9 ~]# groupadd opsadmin
[root@centos9 ~]# tail -4 /etc/group
ansible:x:1001:
aws:x:1003:
devops:x:1004:aws
opsadmin:x:1005:
[root@centos9 ~]# usermod -g opsadmin aws
[root@centos9 ~]# id aws
uid=1003(aws) gid=1005(opsadmin) groups=1005(opsadmin),1004(devops)
[root@centos9 ~]#
Similar to deleting user, we can delete a group:
[root@centos9 ~]# grep devops /etc/group
devops:x:1004:aws
[root@centos9 ~]# id aws
uid=1003(aws) gid=1005(opsadmin) groups=1005(opsadmin),1004(devops)
[root@centos9 ~]# groupdel devops
[root@centos9 ~]# grep devops /etc/group
[root@centos9 ~]# id aws
uid=1003(aws) gid=1005(opsadmin) groups=1005(opsadmin)
[root@centos9 ~]#
The /etc/shadow file
This file stores users password and password related information. Just like /etc/passwd file, this file also uses an individual line for each entry.
- Username
- Encrypted password
- Number of days when password was last changed
- Number of days before password can be changed
- Number of days after password must be changed
- Number of days before password expiry date to display the warning message
- Number of days to disable the account after the password expiry
- Number of days since the account is disabled
- Reserved field
[root@centos9 ~]# head /etc/shadow
root:$6$vfUe7sC97mh55WT6$93JvBCM92/zW3ppjLtvezkCNpDMAbFKmgb4bLHUWyQHGYiwO9TieleszQ0ek.B4FbSn2kTxf04g4dy5qeL7LJ0:19633:0:99999:7:::
bin:*:18849:0:99999:7:::
daemon:*:18849:0:99999:7:::
adm:*:18849:0:99999:7:::
lp:*:18849:0:99999:7:::
sync:*:18849:0:99999:7:::
shutdown:*:18849:0:99999:7:::
halt:*:18849:0:99999:7:::
mail:*:18849:0:99999:7:::
operator:*:18849:0:99999:7:::
[root@centos9 ~]#
There is a few useful commands, for example whoami(will show username) or who (it will show who is logged into system) :
[root@centos9 ~]# whoami
root
[root@centos9 ~]# who
vagrant  pts/0        2023-10-03 09:10 (10.0.2.2)
[root@centos9 ~]#
last command - it'll show last login in system :
[root@centos9 ~]# last
vagrant  pts/0        10.0.2.2         Tue Oct  3 09:10   still logged in
reboot   system boot  5.14.0-366.el9.x Tue Oct  3 09:09   still running
vagrant  pts/1        10.0.2.2         Mon Oct  2 16:12 - 19:32  (03:20)
vagrant  pts/0        10.0.2.2         Mon Oct  2 13:39 - 19:32  (05:53)
reboot   system boot  5.14.0-366.el9.x Mon Oct  2 13:38 - 19:32  (05:54)
vagrant  pts/0        10.0.2.2         Sun Oct  1 16:39 - crash  (20:59)
vagrant  pts/0        10.0.2.2         Sun Oct  1 16:37 - 16:38  (00:01)
vagrant  pts/0        10.0.2.2         Sun Oct  1 15:51 - 16:37  (00:45)
reboot   system boot  5.14.0-366.el9.x Sun Oct  1 15:46 - 19:32 (1+03:46)
vagrant  pts/0        10.0.2.2         Sun Oct  1 11:31 - 15:44  (04:12)
reboot   system boot  5.14.0-366.el9.x Sun Oct  1 11:30 - 15:45  (04:15)
vagrant  pts/0        10.0.2.2         Sat Sep 30 18:21 - 18:21  (00:00)
reboot   system boot  5.14.0-366.el9.x Sat Sep 30 18:20 - 18:22  (00:02)
reboot   system boot  5.14.0-366.el9.x Mon Sep 18 17:44 - 18:06  (00:22)
reboot   system boot  5.14.0-34.el9.x8 Mon Sep 18 17:29 - 17:45  (00:16)

wtmp begins Mon Sep 18 17:29:02 2023
[root@centos9 ~]#
There is also lsof command, that you might have to install if it's not already in your system.
yum install lsof -y
This command is really handy if you want to list files opened by the specific user who is logged in or what user is logged in and doing what, for example:
[root@centos9 ~]# lsof -u vagrant
COMMAND   PID    USER   FD      TYPE             DEVICE SIZE/OFF       NODE NAME
systemd  2598 vagrant  cwd       DIR                8,2      262        128 /
systemd  2598 vagrant  rtd       DIR                8,2      262        128 /
systemd  2598 vagrant  txt       REG                8,2   102120  201589522 /usr/lib/systemd/systemd
systemd  2598 vagrant  mem       REG                8,2   582072  134686216 /etc/selinux/targeted/contexts/files/file_contexts.bin
systemd  2598 vagrant  mem       REG                8,2   904672       1323 /usr/lib64/libm.so.6
systemd  2598 vagrant  mem       REG                8,2   882376      42846 /usr/lib64/libzstd.so.1.5.1
systemd  2598 vagrant  mem       REG                8,2  4483280      86230 /usr/lib64/libcrypto.so.3.0.7
systemd  2598 vagrant  mem       REG                8,2    44784      16738 /usr/lib64/libffi.so.8.1.0
systemd  2598 vagrant  mem       REG                8,2   153600      58634 /u
...
ev/pts/0
[root@centos9 ~]#
Users & Group cheat sheet.
6. File permissions.
Viewing Permissions from the Command-Line.
File permissions may be viewed using ls -l:
-rw-------. 1 root root 2058 Oct  2 15:39 anaconda-ks.cfg
drwxr-xr-x. 2 root root   54 Oct  2 13:53 devopsdir
lrwxrwxrwx. 1 root root   16 Oct  2 17:23 info -> /tmp/sysinfo.txt
-rw-------. 1 root root 1388 Sep 18 17:30 original-ks.cfg
-rw-r--r--. 1 root root   31 Oct  2 17:10 samplefile.txt
Four symbols are used when displaying permissions:
- r : permission to read a file or list a directory's contents
- w : permission to write to a file or create and remove files from a directory
- x : permission to execute a program or change into a directory and do a long listing of the directory
- -: no permission(in place of r, w or x)
Changing File Ownership
Only root can change a file's owner.
Only root or the owner can change a file's group.
Ownership is changed with chown:
- chown [-R] user_name file|directory ...
Group ownership is changed with chgrp:
- chgrp [-R] group_name file|directory ...
Let's practice that by creating a new directory, a new group and four users. Then let's add user1, user2 and user3 to that newly created group:
[root@centos9 ~]# mkdir /opt/awsservice
[root@centos9 ~]# ls -l /opt
total 0
drwxr-xr-x. 2 root    root     6 Oct  3 15:48 awsservice
drwxr-xr-x. 3 root    root    17 Oct  1 16:23 dev
drwxrwx---. 2 ansible devops  25 Oct  3 14:52 devopsdir
drwxr-xr-x. 8 root    root   136 Sep 18 17:48 VBoxGuestAdditions-6.1.46
drwxr-xr--. 2 aws     devops   6 Oct  3 14:55 webdata
[root@centos9 ~]# groupadd admins
[root@centos9 ~]# useradd user1
[root@centos9 ~]# useradd user2
[root@centos9 ~]# useradd user3
[root@centos9 ~]# useradd greg
[root@centos9 ~]# usermod -G admins user1
[root@centos9 ~]# usermod -G admins user2
[root@centos9 ~]# usermod -G admins user3
[root@centos9 ~]#
So, we added user1, user2 and user3 to admins group. Different way of adding is to use Vim editor to add all of them in a same time.
So I have created /opt/awsservice directory, you can check the permission of directory by using ls -ld command:
[root@centos9 ~]# ls -ld /opt/awsservice
drwxr-xr-x. 2 root root 6 Oct  3 15:48 /opt/awsservice
[root@centos9 ~]#
Now, I want to change the ownership to user1 and to admins group, we can use chown command, I'm using here -R(recursively) so it will also apply changes to subdirectories and to all files inside:
[root@centos9 ~]# ls -ld /opt/awsservice/
drwxr-xr-x. 2 root root 6 Oct  3 15:48 /opt/awsservice/
[root@centos9 ~]# chown -R user1:admins /opt/awsservice/
[root@centos9 ~]# ls -ld /opt/awsservice/
drwxr-xr-x. 2 user1 admins 6 Oct  3 15:48 /opt/awsservice/
[root@centos9 ~]#
So, let's change some permissions, user1 got all permissions, but I want to add write permission to admins group and remove read and execute from others.
We got two methods for changing permissions :
- Symbolic Method
- Numeric Method
Changing Permissions - Symbolic Method
To change access modes:
- chmod [-OPTION] ... mode[,mode] file directory ...
Mode includes:
- u, g or o for user, group and other
- +, - or = for grant, deny or set
- r, w or x for read, write and execute
Options include:
- -R Recursive
- -v Verbose
- --reference : Reference another file for its mode
Examples:
- chmod ugo+r file: Grant read access to all for file
- chmod o-wx dir: Deny write and execute to others for dir
In practice, it will look like that:
[root@centos9 ~]# ls -ld /opt/awsservice/
drwxr-xr-x. 2 user1 admins 6 Oct  3 15:48 /opt/awsservice/
[root@centos9 ~]# chmod g+w /opt/awsservice/
[root@centos9 ~]# ls -ld /opt/awsservice/
drwxrwxr-x. 2 user1 admins 6 Oct  3 15:48 /opt/awsservice/
[root@centos9 ~]# chmod o-r /opt/awsservice/
[root@centos9 ~]# ls -ld /opt/awsservice/
drwxrwx--x. 2 user1 admins 6 Oct  3 15:48 /opt/awsservice/
[root@centos9 ~]# chmod o-x /opt/awsservice/
[root@centos9 ~]# ls -ld /opt/awsservice/
drwxrwx---. 2 user1 admins 6 Oct  3 15:48 /opt/awsservice/
[root@centos9 ~]#
So, now it's how I wanted it to be, user1 has full permission to read, write and execute also admins group has full permissions to read, write and execute and others have no permission whatsoever.
Now I'll switch to greg, which is others user for this file, it shouldn't have permissions. Let's test it:
[root@centos9 ~]# su - greg
[greg@centos9 ~]$ whoami
greg
[greg@centos9 ~]$ cd /opt/awsservice/
-bash: cd: /opt/awsservice/: Permission denied
[greg@centos9 ~]$ ls /opt/awsservice/
ls: cannot open directory '/opt/awsservice/': Permission denied
[greg@centos9 ~]$ touch /opt/awsservice/newfile.txt
touch: cannot touch '/opt/awsservice/newfile.txt': Permission denied
[greg@centos9 ~]$
If we switch to user3 then we should have full permissions, let's test it:
[greg@centos9 ~]$ exit
logout
[root@centos9 ~]# su - user3
[user3@centos9 ~]$ id user3
uid=1008(user3) gid=1011(user3) groups=1011(user3),1008(admins)
[user3@centos9 ~]$ cd /opt/awsservice
[user3@centos9 awsservice]$ ls -l
total 0
[user3@centos9 awsservice]$ touch newfile.txt
[user3@centos9 awsservice]$ ls -l
total 0
-rw-r--r--. 1 user3 user3 0 Oct  3 17:40 newfile.txt
[user3@centos9 awsservice]$
[user3@centos9 ~]$ exit
logout
[root@centos9 ~]#
Like you can see user3 got all permissions because it's belongs to admins group.
There is another method I mention before - Numeric.
Changing Permissions - Numeric Method
Uses a three-digit mode number
- First digit specifies owner's permissions
- Second digit specifies group permissions
- Third digit represents others' permissions
Permissions are calculated by adding:
- 4 (for read)
- 2 (for write)
- 1 (for execute)
Example:
- chmod 640 myfile
Let's say that I want to keep the user1 full permission, but remove write permission for the admins group, and add read permission for others. I'll use numeric method this time and add -R option for Recursive:
[root@centos9 ~]# ls -ld /opt/awsservice/
drwxrwx---. 2 user1 admins 25 Oct  3 17:40 /opt/awsservice/
[root@centos9 ~]# chmod -R 754 /opt/awsservice/
[root@centos9 ~]# ls -ld /opt/awsservice/
drwxr-xr--. 2 user1 admins 25 Oct  3 17:40 /opt/awsservice/
[root@centos9 ~]#
So, first digit is a user it has full permission (4 + 2 + 1 = 7), then second digit is admins group it has only read and execute permissions (4 + 1 = 5) and others have read permission (4). Numeric method is easy or quick way to give permission for user, group and others at the same time.
Exercise:
[root@centos9 ~]# ls -ld /opt/awsservice/
drwxrwx---. 2 user1 admins 25 Oct  3 17:40 /opt/awsservice/
[root@centos9 ~]# chmod 754 /opt/awsservice/
[root@centos9 ~]# ls -ld /opt/awsservice/
drwxr-xr--. 2 user1 admins 25 Oct  3 17:40 /opt/awsservice/
[root@centos9 ~]# chmod +x /opt/awsservice/
[root@centos9 ~]# ls -ld /opt/awsservice/
drwxr-xr-x. 2 user1 admins 25 Oct  3 17:40 /opt/awsservice/
[root@centos9 ~]# chmod 660 /opt/awsservice/
[root@centos9 ~]# ls -ld /opt/awsservice/
drw-rw----. 2 user1 admins 25 Oct  3 17:40 /opt/awsservice/
[root@centos9 ~]# chmod +x /opt/awsservice/
[root@centos9 ~]# ls -ld /opt/awsservice/
drwxrwx--x. 2 user1 admins 25 Oct  3 17:40 /opt/awsservice/
[root@centos9 ~]# chmod 444 /opt/awsservice/
[root@centos9 ~]# ls -ld /opt/awsservice/
dr--r--r--. 2 user1 admins 25 Oct  3 17:40 /opt/awsservice/
[root@centos9 ~]# chmod +wx /opt/awsservice/
[root@centos9 ~]# ls -ld /opt/awsservice/
drwxr-xr-x. 2 user1 admins 25 Oct  3 17:40 /opt/awsservice/
[root@centos9 ~]# chmod 444 /opt/awsservice/
[root@centos9 ~]# ls -ld /opt/awsservice/
dr--r--r--. 2 user1 admins 25 Oct  3 17:40 /opt/awsservice/
[root@centos9 ~]# chmod ugo+wx /opt/awsservice/
[root@centos9 ~]# ls -ld /opt/awsservice/
drwxrwxrwx. 2 user1 admins 25 Oct  3 17:40 /opt/awsservice/
[root@centos9 ~]# chmod 754 /opt/awsservice/
[root@centos9 ~]# ls -ld /opt/awsservice/
drwxr-xr--. 2 user1 admins 25 Oct  3 17:40 /opt/awsservice/
[root@centos9 ~]#
7. Sudo
Sudo gives power to a normal user to execute commands which is owned by root user. When we log in as vagrant user we know that vagrant user already has privilege to do sudo, can do sudo -i that will switch to root user, or we can install git when used with sudo prefix:
[vagrant@centos9 ~]$ sudo yum install git -y
Last metadata expiration check: 0:14:11 ago on Wed 04 Oct 2023 09:53:05 AM UTC.
Dependencies resolved.
=======================================================================================
 Package                     Arch        Version                  Repository      Size
=======================================================================================
Installing:
 git                         x86_64      2.39.3-1.el9             appstream       62 k

Complete!
[vagrant@centos9 ~]$
If we not include sudo prefix, then we can expect to see error :
[vagrant@centos9 ~]$ yum install git -y
Error: This command has to be run with superuser privileges (under the root user on most systems).
[vagrant@centos9 ~]$
//or
[vagrant@centos9 ~]$ useradd test
useradd: Permission denied.
useradd: cannot lock /etc/passwd; try again later.
[vagrant@centos9 ~]$
So, now let's switch to root user and let's log in as a aws user. Then we can try to use sudo command to add a new user and see if we can.
[vagrant@centos9 ~]$ sudo -i
[root@centos9 ~]# su - aws
Last login: Wed Oct  4 10:14:52 UTC 2023 on pts/0
[aws@centos9 ~]$ sudo useradd test12

We trust you have received the usual lecture from the local System
Administrator. It usually boils down to these three things:

  #1) Respect the privacy of others.
  #2) Think before you type.
  #3) With great power comes great responsibility.

[sudo] password for aws:
aws is not in the sudoers file.  This incident will be reported.
[aws@centos9 ~]$
It asked for a password, but even when entered a valid one, we can't add a new user. It's saying that we not in the sudoers file. What are the sudoers file and how we can add user? Let's switch back to root user and check the /etc/sudoers file:
[aws@centos9 ~]$ exit
logout
[root@centos9 ~]# ls -l /etc/sudoers
-r--r-----. 1 root root 4328 Jan 19  2023 /etc/sudoers
[root@centos9 ~]#
This file has only read permissions for our root user and cannot be access with vim for example. The only way to access is with visudo command. This command will open sudoers file in the write mode in vim.
[root@centos9 ~]# visudo
Inside we can search for /root user and then cp that line and then add new user :
## Allow root to run any commands anywhere
root    ALL=(ALL)       ALL   // copy this line beneath
aws    ALL=(ALL)       ALL   // add the the name of the user
Now, lets login aws user and see if it has sudo privilege:
[root@centos9 ~]# su - aws
Last login: Wed Oct  4 10:15:33 UTC 2023 on pts/0
[aws@centos9 ~]$ sudo -i
[sudo] password for aws:
[root@centos9 ~]#
Well it does have a sudo privilege, but it's interactive, it's asking me password for my user login, if you don't want that, we can change this in sudoers file.
## Allow root to run any commands anywhere
root    ALL=(ALL)       ALL
aws    ALL=(ALL)       NOPASSWD: ALL // add here this NOPASSWD:

[root@centos9 ~]# su - aws
Last login: Wed Oct  4 11:04:41 UTC 2023 on pts/0
[aws@centos9 ~]$ sudo -i
[root@centos9 ~]#
No password being asked for the aws user this time. What if you will make some error inside sudoers file, let's see an example :
[root@centos9 ~]# ls -l /etc/sudoers
-r--r-----. 1 root root 4365 Oct  4 11:08 /etc/sudoers
[root@centos9 ~]# visudo
/etc/sudoers:9:18: syntax error
asdasdasdasdasdas
                 ^
What now? e
[root@centos9 ~]#
I had some typo in line 9 of the sudoers file, and because of that I had to press e(edit) and come back and fix the typo in line 9 then save and exit vim editor (:wq). So you see there is a chance of human error in that file, and that will lead to a non-functional sudoers files, so sudo command will not work then. You will be stuck if you don't have the root password, which most of the servers will not have the root password set for security purpose. You will have normal user login, like we have vagrant user. We will have any other normal user login and then that can be switched to root user, by using sudo. So if you want to fix that file, it will be a problem because the sudo will not work, and you don't have the root password. Sure, there are some other methods, but that will lead to more problems.
So the better solution is instead of editing that sudoers file, you can go to: /etc/sudoers.d/ and here you can create your own file. There is already a file vagrant that contain vagrant user :
[root@centos9 ~]# cd /etc/sudoers.d
[root@centos9 sudoers.d]# ls
vagrant
[root@centos9 sudoers.d]# cat vagrant
%vagrant ALL=(ALL) NOPASSWD: ALL
[root@centos9 sudoers.d]#
We can copy this file, edit and add our admins group:
[root@centos9 sudoers.d]# cat vagrant
%vagrant ALL=(ALL) NOPASSWD: ALL
[root@centos9 sudoers.d]# cp vagrant devops
[root@centos9 sudoers.d]# vim devops
[root@centos9 sudoers.d]# cat devops
%admins ALL=(ALL) NOPASSWD: ALL
[root@centos9 sudoers.d]#
And now any user which belongs to admins group can do sudo. Note, that you can add also a username there instead of the group. So this is much safer option compare to directly editing the sudoers file.
[root@centos9 sudoers.d]# cat *
%admins ALL=(ALL) NOPASSWD: ALL
%vagrant ALL=(ALL) NOPASSWD: ALL
[root@centos9 sudoers.d]# tail -4 /etc/passwd
user1:x:1006:1009::/home/user1:/bin/bash
user2:x:1007:1010::/home/user2:/bin/bash
user3:x:1008:1011::/home/user3:/bin/bash
greg:x:1009:1012::/home/greg:/bin/bash
[root@centos9 sudoers.d]# id user3
uid=1008(user3) gid=1011(user3) groups=1011(user3),1008(admins)
[root@centos9 sudoers.d]# su - user3
Last login: Tue Oct  3 17:40:01 UTC 2023 on pts/0
[user3@centos9 ~]$ sudo -i
[root@centos9 ~]#
There are many more options in the sudoers file, you can give special commands for a particular user to execute. For now, we are not going to talk about them the most important is to now how to use a sudo or where to go to get sudo privilege.
8. Software Management.
For CentOS
In Linux there are very different methods of installing or setting up a package or software, let's start with the very basic, very manual approach first.
You can search for the package on the internet, download it and install using
curl command and the url of the package, you have to use -o option to take the output of this link and save it to a file. You can give a name to that file:
[root@centos9 ~]# curl https://rpmfind.net/linux/centos-stream/9-stream/BaseOS/x86_64/os/Packages/tree-1.8.0-10.el9.x86_64.rpm -o tree-1.8.0-10.el9.x86_64.rpm
  % Total    % Received % Xferd  Average Speed   Time    Time     Time  Current
                                 Dload  Upload   Total   Spent    Left  Speed
100 56943  100 56943    0     0   147k      0 --:--:-- --:--:-- --:--:--  147k
[root@centos9 ~]# ls
anaconda-ks.cfg                info             tree-1.8.0-10.el9.x86_64.rpm
devopsdir                      original-ks.cfg  samplefile.txt
[root@centos9 ~]#
To install it, we have the command rpm -i option is used for install, -v for verbose which means printing it, -h is for human readable, so print in a human readable format when you're installing it:
[root@centos9 ~]# rpm -ivh tree-1.8.0-10.el9.x86_64.rpm
Verifying...                          ################################# [100%]
Preparing...                          ################################# [100%]
Updating / installing...
   1:tree-1.8.0-10.el9                ################################# [100%]
[root@centos9 ~]#
It was really a small package, and installation was very fast. Now we can use it our newly installed package:
[root@centos9 ~]# tree
.
├── anaconda-ks.cfg
├── devopsdir
│   ├── anaconda-ks.cfg
│   └── mybootingfile.cfg
├── info -> /tmp/sysinfo.txt
├── original-ks.cfg
├── samplefile.txt
└── tree-1.8.0-10.el9.x86_64.rpm

1 directory, 7 files
[root@centos9 ~]#
Let's try to find one more package called httpd and install it.
[root@centos9 ~]# curl https://rpmfind.net/linux/centos-stream/9-stream/AppStream/x86_64/os/Packages/httpd-2.4.57-3.el9.x86_64.rpm -o httpd-2.4.57-3.el9.x86_64.rpm
 % Total    % Received % Xferd  Average Speed   Time    Time     Time  Current
                                Dload  Upload   Total   Spent    Left  Speed
100 49437  100 49437    0     0   131k      0 --:--:-- --:--:-- --:--:--  130k
[root@centos9 ~]# ls
anaconda-ks.cfg                info             tree-1.8.0-10.el9.x86_64.rpm
devopsdir                      original-ks.cfg
httpd-2.4.57-3.el9.x86_64.rpm  samplefile.txt
[root@centos9 ~]# rpm -ivh httpd-2.4.57-3.el9.x86_64.rpm
error: Failed dependencies:
       httpd-core = 0:2.4.57-3.el9 is needed by httpd-2.4.57-3.el9.x86_64
       system-logos-httpd is needed by httpd-2.4.57-3.el9.x86_64
[root@centos9 ~]#
It does not work, It says failed dependencies. It's saying that you need to install these other RPM's: httpd-core and system-logos-httpd, and once you install this, then only you can install httpd. So there is a dependecy. Now there is just 2 dependency. You can really find those, download and install them, and then you can install httpd.
But what if you have hundreds of dependencies? Yeah, and that's the case so many times because in Linux principle, we have small single purpose programs that are chained together to perform complex operations. So, you will very regularly hit this dependencies problem and that can be solved very easily. Like we have rpm, which can install the package, or it can even uninstall package.
RedHat RPM commands:
You have other package managers also like yum for RedHat. So as we go on the internet, search for rpm, download and install, instead of that, you can use yum, which will do all that for you. It will automate the process of package installation or management. So, it does that by using some configuration file:
[root@centos9 ~]# cd /etc/yum.repos.d/
[root@centos9 yum.repos.d]# ls
centos-addons.repo  centos.repo  jenkins.repo
[root@centos9 yum.repos.d]#
You see some files, these files points to some repositories on the internet. All the files will have some repository information, from where yum can search for the software, download and install with all dependencies. Now, we can try to install htppd using yum this time:
[root@centos9 ~]# yum install httpd
Last metadata expiration check: 1:39:30 ago on Wed 04 Oct 2023 01:43:45 PM UTC.
Dependencies resolved.
=======================================================================================
 Package                   Architecture  Version                Repository        Size
=======================================================================================
Installing:
 httpd                     x86_64        2.4.57-5.el9           appstream         47 k
Installing dependencies:
 apr                       x86_64        1.7.0-11.el9           appstream        123 k
 apr-util                  x86_64        1.6.1-23.el9           appstream         95 k
 apr-util-bdb              x86_64        1.6.1-23.el9           appstream         13 k
 centos-logos-httpd        noarch        90.4-1.el9             appstream        252 k
 httpd-core                x86_64        2.4.57-5.el9           appstream        1.4 M
 httpd-filesystem          noarch        2.4.57-5.el9           appstream         14 k
 httpd-tools               x86_64        2.4.57-5.el9           appstream         81 k
Installing weak dependencies:
 apr-util-openssl          x86_64        1.6.1-23.el9           appstream         15 k
 mod_http2                 x86_64        1.15.19-5.el9          appstream        149 k
 mod_lua                   x86_64        2.4.57-5.el9           appstream         61 k

Transaction Summary
=======================================================================================
Install  11 Packages

Total download size: 2.2 M
Installed size: 6.4 M
Is this ok [y/N]: y
It asks me if this is ok to install all the dependencies, there is an option -y it will not ask anymore.
Downloading Packages:
(1/11): apr-util-bdb-1.6.1-23.el9.x86_64.rpm            96 kB/s |  13 kB     00:00
(2/11): apr-util-openssl-1.6.1-23.el9.x86_64.rpm       349 kB/s |  15 kB     00:00
(3/11): apr-util-1.6.1-23.el9.x86_64.rpm               414 kB/s |  95 kB     00:00
(4/11): apr-1.7.0-11.el9.x86_64.rpm                    512 kB/s | 123 kB     00:00
(5/11): httpd-2.4.57-5.el9.x86_64.rpm                  1.0 MB/s |  47 kB     00:00
(6/11): httpd-filesystem-2.4.57-5.el9.noarch.rpm       372 kB/s |  14 kB     00:00
(7/11): centos-logos-httpd-90.4-1.el9.noarch.rpm       1.7 MB/s | 252 kB     00:00
(8/11): httpd-tools-2.4.57-5.el9.x86_64.rpm            1.5 MB/s |  81 kB     00:00
(9/11): mod_http2-1.15.19-5.el9.x86_64.rpm             2.9 MB/s | 149 kB     00:00
(10/11): httpd-core-2.4.57-5.el9.x86_64.rpm            7.5 MB/s | 1.4 MB     00:00
(11/11): mod_lua-2.4.57-5.el9.x86_64.rpm               1.1 MB/s |  61 kB     00:00
---------------------------------------------------------------------------------------
Total                                                  1.6 MB/s | 2.2 MB     00:01
Running transaction check
Transaction check succeeded.
Running transaction test
Transaction test succeeded.
Running transaction
  Preparing        :                                                               1/1
  Installing       : apr-1.7.0-11.el9.x86_64                                      1/11
  Installing       : apr-util-bdb-1.6.1-23.el9.x86_64                             2/11
  Installing       : apr-util-openssl-1.6.1-23.el9.x86_64                         3/11
  Installing       : apr-util-1.6.1-23.el9.x86_64                                 4/11
  Installing       : httpd-tools-2.4.57-5.el9.x86_64                              5/11
  Running scriptlet: httpd-filesystem-2.4.57-5.el9.noarch                         6/11
  Installing       : httpd-filesystem-2.4.57-5.el9.noarch                         6/11
  Installing       : httpd-core-2.4.57-5.el9.x86_64                               7/11
  Installing       : mod_lua-2.4.57-5.el9.x86_64                                  8/11
  Installing       : centos-logos-httpd-90.4-1.el9.noarch                         9/11
  Installing       : mod_http2-1.15.19-5.el9.x86_64                              10/11
  Installing       : httpd-2.4.57-5.el9.x86_64                                   11/11
  Running scriptlet: httpd-2.4.57-5.el9.x86_64                                   11/11
  Verifying        : apr-1.7.0-11.el9.x86_64                                      1/11
  Verifying        : apr-util-1.6.1-23.el9.x86_64                                 2/11
  Verifying        : apr-util-bdb-1.6.1-23.el9.x86_64                             3/11
  Verifying        : apr-util-openssl-1.6.1-23.el9.x86_64                         4/11
  Verifying        : centos-logos-httpd-90.4-1.el9.noarch                         5/11
  Verifying        : httpd-2.4.57-5.el9.x86_64                                    6/11
  Verifying        : httpd-core-2.4.57-5.el9.x86_64                               7/11
  Verifying        : httpd-filesystem-2.4.57-5.el9.noarch                         8/11
  Verifying        : httpd-tools-2.4.57-5.el9.x86_64                              9/11
  Verifying        : mod_http2-1.15.19-5.el9.x86_64                              10/11
  Verifying        : mod_lua-2.4.57-5.el9.x86_64                                 11/11

Installed:
  apr-1.7.0-11.el9.x86_64                    apr-util-1.6.1-23.el9.x86_64
  apr-util-bdb-1.6.1-23.el9.x86_64           apr-util-openssl-1.6.1-23.el9.x86_64
  centos-logos-httpd-90.4-1.el9.noarch       httpd-2.4.57-5.el9.x86_64
  httpd-core-2.4.57-5.el9.x86_64             httpd-filesystem-2.4.57-5.el9.noarch
  httpd-tools-2.4.57-5.el9.x86_64            mod_http2-1.15.19-5.el9.x86_64
  mod_lua-2.4.57-5.el9.x86_64

Complete!
[root@centos9 ~]#
So like you can see, yum doing all the heavy work for us, we can install or remove package. Let's now remove httpd package and install again using -y option and maybe instead of see the output we can redirect it to /dev/null :
[root@centos9 ~]# yum remove httpd
Dependencies resolved.
=======================================================================================
 Package                   Architecture  Version               Repository         Size
=======================================================================================
Removing:
 httpd                     x86_64        2.4.57-5.el9          @appstream         59 k
Removing unused dependencies:
 apr                       x86_64        1.7.0-11.el9          @appstream        289 k
 apr-util                  x86_64        1.6.1-23.el9          @appstream        211 k
 apr-util-bdb              x86_64        1.6.1-23.el9          @appstream         15 k
 apr-util-openssl          x86_64        1.6.1-23.el9          @appstream         23 k
 centos-logos-httpd        noarch        90.4-1.el9            @appstream        450 k
 httpd-core                x86_64        2.4.57-5.el9          @appstream        4.6 M
 httpd-filesystem          noarch        2.4.57-5.el9          @appstream        400
 httpd-tools               x86_64        2.4.57-5.el9          @appstream        198 k
 mod_http2                 x86_64        1.15.19-5.el9         @appstream        385 k
 mod_lua                   x86_64        2.4.57-5.el9          @appstream        142 k

Transaction Summary
=======================================================================================
Remove  11 Packages

Freed space: 6.4 M
Is this ok [y/N]: y
Package removed, now let's install again with -y:
[root@centos9 ~]# yum install httpd -y > /dev/null
[root@centos9 ~]# rpm -qa | grep httpd
httpd-tools-2.4.57-5.el9.x86_64
httpd-filesystem-2.4.57-5.el9.noarch
httpd-core-2.4.57-5.el9.x86_64
centos-logos-httpd-90.4-1.el9.noarch
httpd-2.4.57-5.el9.x86_64  // our package
[root@centos9 ~]#
Sometimes you want to install some package with yum, for example Jenkins, so let's try it:
[root@centos9 yum.repos.d]# yum install jenkins
Last metadata expiration check: 2:01:07 ago on Wed 04 Oct 2023 01:43:45 PM UTC.
No match for argument: jenkins
Error: Unable to find a match: jenkins
[root@centos9 yum.repos.d]#
And it'll show and error that it has nothing to do because Jenkins package is not available in any of the repositories that are in yum configuration file:
[root@centos9 yum.repos.d]# ls
centos-addons.repo  centos.repo
[root@centos9 yum.repos.d]#
So if it's not there, then you can always search for it one the internet, you should find the vendor documentation where, they'll mention the steps to install a particular package.
So, official Jenkins documentation it's giving us this steps to install Jenkins through yum on RedHat Linux:
sudo wget -O /etc/yum.repos.d/jenkins.repo \
    https://pkg.jenkins.io/redhat-stable/jenkins.repo
sudo rpm --import https://pkg.jenkins.io/redhat-stable/jenkins.io-2023.key
sudo yum upgrade
# Add required dependencies for the jenkins package
sudo yum install fontconfig java-17-openjdk
sudo yum install jenkins
sudo systemctl daemon-reload
Let's do line by line and see what will happen. First we need to install wget, wget is going to working like curl. Note, that wget should be already install in your system, it was in mine. I just removed it, so I can install it to show you the whole process.
[root@centos9 yum.repos.d]# yum install wget -y
...
...
Complete!
[root@centos9 yum.repos.d]# cd
Step1:
[root@centos9 ~]#  wget -O /etc/yum.repos.d/jenkins.repo \
    https://pkg.jenkins.io/redhat-stable/jenkins.repo
--2023-10-04 16:08:44--  https://pkg.jenkins.io/redhat-stable/jenkins.repo
Resolving pkg.jenkins.io (pkg.jenkins.io)... 146.75.122.133, 2a04:4e42:8e::645
Connecting to pkg.jenkins.io (pkg.jenkins.io)|146.75.122.133|:443... connected.
HTTP request sent, awaiting response... 200 OK
Length: 85
Saving to: ‘/etc/yum.repos.d/jenkins.repo’

/etc/yum.repos.d/jenk 100%[========================>]      85  --.-KB/s    in 0s

2023-10-04 16:08:44 (2.33 MB/s) - ‘/etc/yum.repos.d/jenkins.repo’ saved [85/85]

[root@centos9 ~]#
Note: \ backward slash means that you can give command in two lines. This first command created a file with the repository details.
[root@centos9 ~]# cat /etc/yum.repos.d/jenkins.repo
[jenkins]
name=Jenkins-stable
baseurl=http://pkg.jenkins.io/redhat-stable
gpgcheck=1
[root@centos9 ~]#
Step2: Sometimes you will have a key for a repository, you may have rpm --import command and a link. So this key will provide access to this repository.
[root@centos9 ~]# rpm --import https://pkg.jenkins.io/redhat-stable/jenkins.io-2023.key
[root@centos9 ~]#
Step3:
[root@centos9 ~]# yum install fontconfig java-17-openjdk jenkins -y
...
...
...
Complete!
[root@centos9 ~]#
And it's done, we successfully installed Jenkins with all the dependencies, so you see, it's easy to do it with yum, if yum has access to the right repository.
Step: 4
[root@centos9 ~]# yum upgrade
Last metadata expiration check: 2:56:37 ago on Wed 04 Oct 2023 01:43:45 PM UTC.
Dependencies resolved.
Nothing to do.
Complete!
[root@centos9 ~]#
yum upgrade it's going to read all your packages and match it with the latest packages, basically it will update all packages. Like you can see I have everything up to date, but it is always preferred to update all your packages because it may have security vulnerability or performance issue that can be fixed by this new patches.
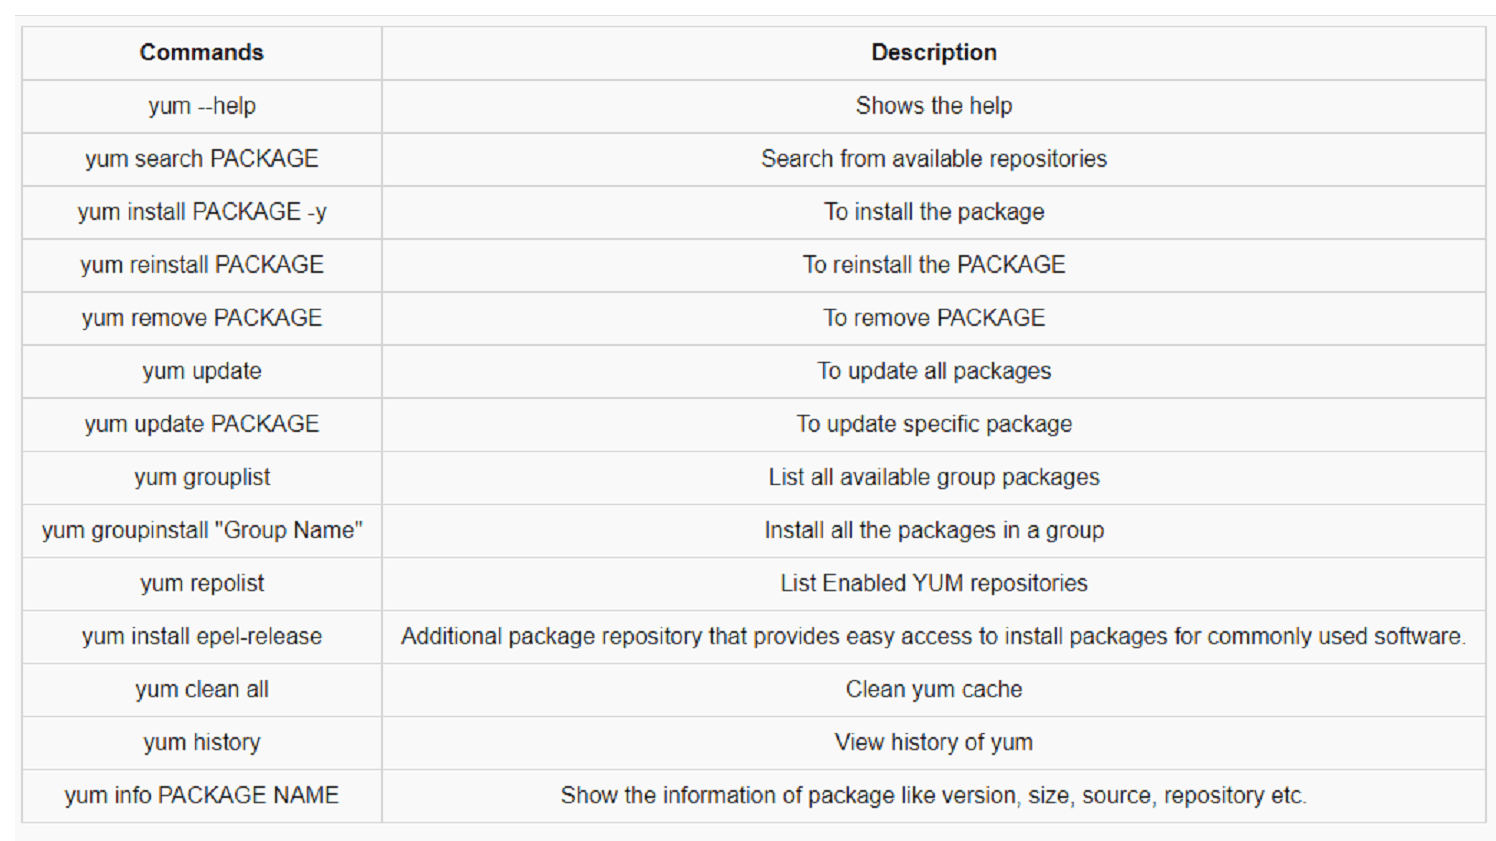
YUM Commands
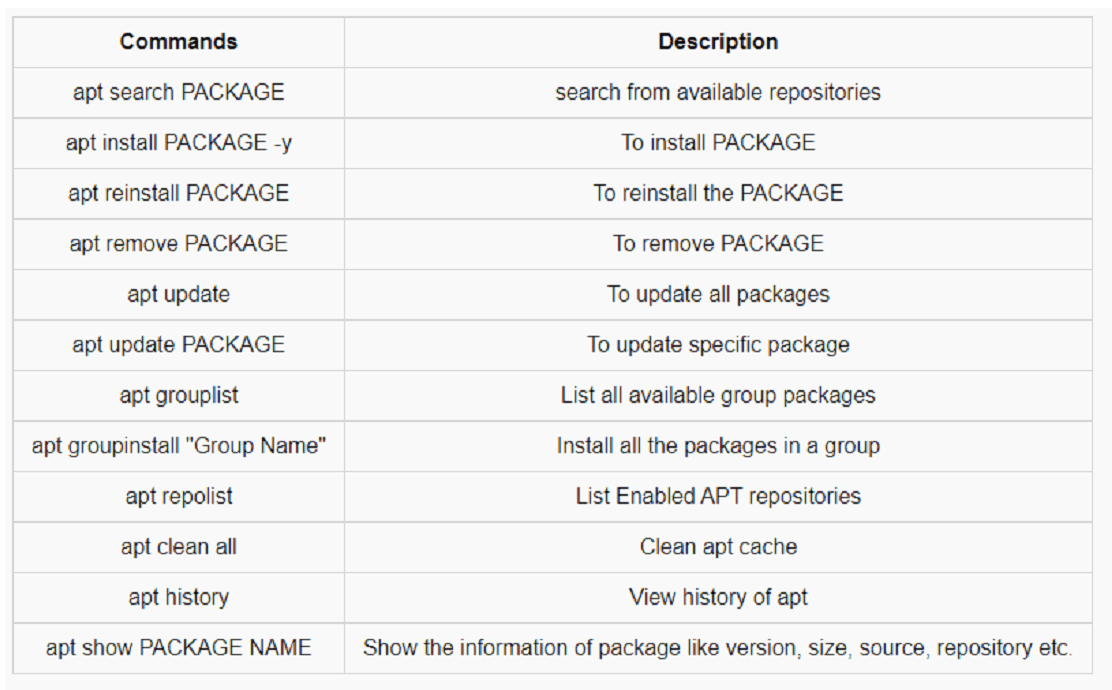
For systems with Ubuntu
APT Commands
9. Services
CentOS 9 System
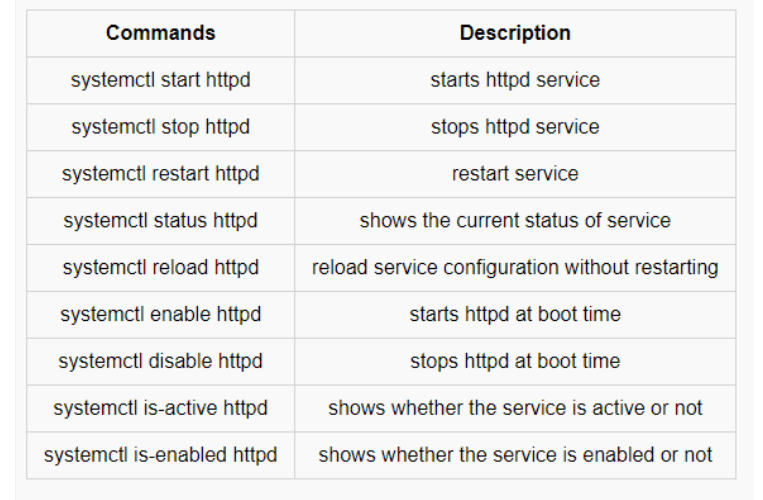
Let's play a little with systemctl command on our httpd service that we install with yum last time. First we can check status of httpd service:
[root@centos9 ~]# systemctl status httpd
○ httpd.service - The Apache HTTP Server
     Loaded: loaded (/usr/lib/systemd/system/httpd.service; disabled; preset: disabled)
     Active: inactive (dead)
       Docs: man:httpd.service(8)

Oct 04 19:04:33 centos9.devops.in systemd[1]: Starting The Apache HTTP Server...
Oct 04 19:04:34 centos9.devops.in systemd[1]: Started The Apache HTTP Server.
Oct 04 19:04:34 centos9.devops.in httpd[541]: Server configured, listening on: port 80
Oct 04 19:37:15 centos9.devops.in systemd[1]: Stopping The Apache HTTP Server...
Oct 04 19:37:16 centos9.devops.in systemd[1]: httpd.service: Deactivated successfully.
Oct 04 19:37:16 centos9.devops.in systemd[1]: Stopped The Apache HTTP Server.
Oct 04 19:37:16 centos9.devops.in systemd[1]: httpd.service: Consumed 1.411s CPU time.
[root@centos9 ~]#
It's inactive, let's start it then:
[root@centos9 ~]# systemctl start httpd
[root@centos9 ~]# systemctl status httpd
● httpd.service - The Apache HTTP Server
     Loaded: loaded (/usr/lib/systemd/system/httpd.service; disabled; preset: disabled)
     Active: active (running) since Wed 2023-10-04 19:42:37 UTC; 1s ago
       Docs: man:httpd.service(8)
   Main PID: 1448 (httpd)
     Status: "Started, listening on: port 80"
      Tasks: 213 (limit: 4612)
     Memory: 22.9M
        CPU: 140ms
     CGroup: /system.slice/httpd.service
             ├─1448 /usr/sbin/httpd -DFOREGROUND
             ├─1449 /usr/sbin/httpd -DFOREGROUND
             ├─1450 /usr/sbin/httpd -DFOREGROUND
             ├─1451 /usr/sbin/httpd -DFOREGROUND
             └─1452 /usr/sbin/httpd -DFOREGROUND

Oct 04 19:42:37 centos9.devops.in systemd[1]: Starting The Apache HTTP Server...
Oct 04 19:42:37 centos9.devops.in systemd[1]: Started The Apache HTTP Server.
Oct 04 19:42:37 centos9.devops.in httpd[1448]: Server configured, listening on: port 80
[root@centos9 ~]#
Great, up and running let's do some checking :
[root@centos9 ~]# systemctl is-active httpd
active
[root@centos9 ~]# systemctl is-enabled httpd
disabled
[root@centos9 ~]#
System it's active, but when we reboot our system it will be inactive because is disabled on boot. Let's enable it now and do test by rebooting our system:
[root@centos9 ~]# systemctl enable httpd
Created symlink /etc/systemd/system/multi-user.target.wants/httpd.service → /usr/lib/systemd/system/httpd.service.
[root@centos9 ~]# systemctl is-enabled httpd
enabled
[root@centos9 ~]#
[root@centos9 ~]# exit
logout
[vagrant@centos9 ~]$ sudo reboot
[vagrant@centos9 ~]$ Connection to 127.0.0.1 closed by remote host.
Connection to 127.0.0.1 closed.
Bizon@DESKTOP-49VTO78 MINGW64 /f/vagrant-vms/centos
$ vagrant ssh
This box was generated by EuroLinux
Any suggestions are welcome at https://github.com/EuroLinux/cloud-images-rfc/
Happy using.
To delete this message use:
echo '' > /etc/motd
Last login: Wed Oct  4 19:04:37 2023 from 10.0.2.2
[vagrant@centos9 ~]$ sudo -i
[root@centos9 ~]# systemctl status httpd
● httpd.service - The Apache HTTP Server
     Loaded: loaded (/usr/lib/systemd/system/httpd.service; enabled; preset: disabled)
     Active: active (running) since Wed 2023-10-04 19:48:27 UTC; 58s ago
       Docs: man:httpd.service(8)
   Main PID: 562 (httpd)
     Status: "Total requests: 0; Idle/Busy workers 100/0;Requests/sec: 0; Bytes served>
      Tasks: 213 (limit: 4612)
     Memory: 34.5M
        CPU: 207ms
     CGroup: /system.slice/httpd.service
             ├─562 /usr/sbin/httpd -DFOREGROUND
             ├─574 /usr/sbin/httpd -DFOREGROUND
             ├─575 /usr/sbin/httpd -DFOREGROUND
             ├─576 /usr/sbin/httpd -DFOREGROUND
             └─577 /usr/sbin/httpd -DFOREGROUND

Oct 04 19:48:26 centos9.devops.in systemd[1]: Starting The Apache HTTP Server...
Oct 04 19:48:27 centos9.devops.in httpd[562]: Server configured, listening on: port 80
Oct 04 19:48:27 centos9.devops.in systemd[1]: Started The Apache HTTP Server.

[root@centos9 ~]#
We can reload service configuration without restarting
[root@centos9 ~]# systemctl reload httpd
[root@centos9 ~]# systemctl status httpd
● httpd.service - The Apache HTTP Server
     Loaded: loaded (/usr/lib/systemd/system/httpd.service; enabled; preset: disabled)
     Active: active (running) since Wed 2023-10-04 19:48:27 UTC; 6min ago
       Docs: man:httpd.service(8)
    Process: 1612 ExecReload=/usr/sbin/httpd $OPTIONS -k graceful (code=exited, status>
   Main PID: 562 (httpd)
     Status: "Configuration loaded."
      Tasks: 213 (limit: 4612)
     Memory: 32.6M
        CPU: 706ms
     CGroup: /system.slice/httpd.service
             ├─ 562 /usr/sbin/httpd -DFOREGROUND
             ├─1613 /usr/sbin/httpd -DFOREGROUND
             ├─1614 /usr/sbin/httpd -DFOREGROUND
             ├─1615 /usr/sbin/httpd -DFOREGROUND
             └─1616 /usr/sbin/httpd -DFOREGROUND

Oct 04 19:48:26 centos9.devops.in systemd[1]: Starting The Apache HTTP Server...
Oct 04 19:48:27 centos9.devops.in httpd[562]: Server configured, listening on: port 80
Oct 04 19:48:27 centos9.devops.in systemd[1]: Started The Apache HTTP Server.
Oct 04 19:53:26 centos9.devops.in systemd[1]: Reloading The Apache HTTP Server...
Oct 04 19:53:26 centos9.devops.in systemd[1]: Reloaded The Apache HTTP Server.
Oct 04 19:53:26 centos9.devops.in httpd[562]: Server configured, listening on: port 80
Oct 04 19:54:26 centos9.devops.in systemd[1]: Reloading The Apache HTTP Server...
Oct 04 19:54:26 centos9.devops.in systemd[1]: Reloaded The Apache HTTP Server.
Oct 04 19:54:26 centos9.devops.in httpd[562]: Server configured, listening on: port 80
[root@centos9 ~]#
The logs will show how many times service was reloaded or restarted. The systemctl works based on its configuration file and for httpd, there should be a configuration file which got created when we installed httpd.
[root@centos9 ~]# cat /etc/systemd/system/multi-user.target.wants/httpd.service
#       [Service]
#       Environment=OPTIONS=-DMY_DEFINE

[Unit]
Description=The Apache HTTP Server
Wants=httpd-init.service
After=network.target remote-fs.target nss-lookup.target httpd-init.service
Documentation=man:httpd.service(8)

[Service]
Type=notify
Environment=LANG=C

ExecStart=/usr/sbin/httpd $OPTIONS -DFOREGROUND
ExecReload=/usr/sbin/httpd $OPTIONS -k graceful
# Send SIGWINCH for graceful stop
KillSignal=SIGWINCH
KillMode=mixed
PrivateTmp=true
OOMPolicy=continue

[Install]
WantedBy=multi-user.target
[root@centos9 ~]#
When we run sytemctl start httpd, it's going to read the httpd configuration file, see ExecStart line for how to start, and the same thing for how stop or reload, etc.
10. Processes.
There are so many processes you will see running in the Linux system, running or sleeping. There is one command top which will show all the dynamic processes based on their consumption of CPU and RAM.
[root@centos9 ~]# top
top - 06:07:59 up 42 min,  1 user,  load average: 0.07, 0.02, 0.00
Tasks: 104 total,   1 running, 103 sleeping,   0 stopped,   0 zombie
%Cpu(s):  0.3 us,  0.3 sy,  0.0 ni, 99.0 id,  0.0 wa,  0.3 hi,  0.0 si,  0.0 st
MiB Mem :    757.5 total,    379.1 free,    287.1 used,    216.0 buff/cache
MiB Swap:   1024.0 total,   1024.0 free,      0.0 used.    470.3 avail Mem

    PID USER      PR  NI    VIRT    RES    SHR S  %CPU  %MEM     TIME+ COMMAND
   3973 apache    20   0 1210620  15220   5916 S   0.7   2.0   0:00.12 httpd
   4218 root      20   0   10540   3984   3348 R   0.7   0.5   0:00.07 top
     11 root      20   0       0      0      0 I   0.3   0.0   0:00.90 kworker/u2:1-e+
      1 root      20   0  106844  16464  10824 S   0.0   2.1   0:02.12 systemd
      2 root      20   0       0      0      0 S   0.0   0.0   0:00.00 kthreadd
      3 root       0 -20       0      0      0 I   0.0   0.0   0:00.00 rcu_gp
      4 root       0 -20       0      0      0 I   0.0   0.0   0:00.00 rcu_par_gp
      5 root       0 -20       0      0      0 I   0.0   0.0   0:00.00 slub_flushwq
      6 root       0 -20       0      0      0 I   0.0   0.0   0:00.00 netns
      8 root       0 -20       0      0      0 I   0.0   0.0   0:00.00 kworker/0:0H-e+
     10 root       0 -20       0      0      0 I   0.0   0.0   0:00.00 mm_percpu_wq
     12 root      20   0       0      0      0 I   0.0   0.0   0:00.00 rcu_tasks_kthre
     13 root      20   0       0      0      0 I   0.0   0.0   0:00.00 rcu_tasks_rude_
     14 root      20   0       0      0      0 I   0.0   0.0   0:00.00 rcu_tasks_trace
     15 root      20   0       0      0      0 S   0.0   0.0   0:00.09 ksoftirqd/0
     16 root      20   0       0      0      0 S   0.0   0.0   0:00.13 pr/ttyS0
     17 root      20   0       0      0      0 S   0.0   0.0   0:00.21 pr/tty0
     18 root      20   0       0      0      0 I   0.0   0.0   0:00.10 rcu_preempt
     19 root      rt   0       0      0      0 S   0.0   0.0   0:00.00 migration/0
     20 root     -51   0       0      0      0 S   0.0   0.0   0:00.00 idle_inject/0
     22 root      20   0       0      0      0 S   0.0   0.0   0:00.00 cpuhp/0
...
# q
[root@centos9 ~]#
It's similar to task manager on Windows, and it's a very helpful command, it's shows a lot of information. Like :
- uptime
- number of users log in
- load average(Load Average is CPU wait time, it is different from CPU utilization.)
- how many tasks(processes) in total
- how many is running
- how many currently sleeping
- number of stopped state processes
- number of zombie processes
- CPU utilization
- RAM and swap detail(better to see through free -m command)
- process id (PID)
- user who's running that process
- RAM and CPU consumption
- status of the process
- process name
If you want to get out of this command press q.
Zombie process is a process that has completed its task(it's dead), but still it shows an entry in a process table.
Zombie process it is not consuming resources, but it may create some problems. The best way to clear zombie process is to reboot your machine, but there are some other ways to refresh process table also.
Another command is ps aux is show similar information as a top command, but it displays information on the screen, and just quits.
[root@centos9 ~]# ps aux
USER         PID %CPU %MEM    VSZ   RSS TTY      STAT START   TIME COMMAND
root           1  0.0  2.1 106844 16472 ?        Ss   05:25   0:02 /usr/lib/systemd/sys
root           2  0.0  0.0      0     0 ?        S    05:25   0:00 [kthreadd]
root           3  0.0  0.0      0     0 ?        I<   05:25   0:00 [rcu_gp]
root           4  0.0  0.0      0     0 ?        I<   05:25   0:00 [rcu_par_gp]
root           5  0.0  0.0      0     0 ?        I<   05:25   0:00 [slub_flushwq]
root           6  0.0  0.0      0     0 ?        I<   05:25   0:00 [netns]
root           8  0.0  0.0      0     0 ?        I<   05:25   0:00 [kworker/0:0H-events
root          10  0.0  0.0      0     0 ?        I<   05:25   0:00 [mm_percpu_wq]
root          11  0.0  0.0      0     0 ?        I    05:25   0:00 [kworker/u2:1-events
root          12  0.0  0.0      0     0 ?        I    05:25   0:00 [rcu_tasks_kthre]
root          13  0.0  0.0      0     0 ?        I    05:25   0:00 [rcu_tasks_rude_]
root          14  0.0  0.0      0     0 ?        I    05:25   0:00 [rcu_tasks_trace]
root          15  0.0  0.0      0     0 ?        S    05:25   0:00 [ksoftirqd/0]
root          16  0.0  0.0      0     0 ?        S    05:25   0:00 [pr/ttyS0]
root          17  0.0  0.0      0     0 ?        S    05:25   0:00 [pr/tty0]
root          18  0.0  0.0      0     0 ?        I    05:25   0:00 [rcu_preempt]
root          19  0.0  0.0      0     0 ?        S    05:25   0:00 [migration/0]
root          20  0.0  0.0      0     0 ?        S    05:25   0:00 [idle_inject/0]
...
root        3160  0.0  1.4  18988 11564 ?        Ss   05:26   0:00 sshd: vagrant [priv]
vagrant     3164  0.0  1.7  22388 13672 ?        Ss   05:26   0:00 /usr/lib/systemd/systemd --user
vagrant     3166  0.0  0.6 107696  5404 ?        S    05:26   0:00 (sd-pam)
vagrant     3174  0.0  0.9  19348  7316 ?        S    05:26   0:00 sshd: vagrant@pts/0
vagrant     3175  0.0  0.7   8688  5520 pts/0    Ss   05:26   0:00 -bash
root        3200  0.0  1.1  19464  8728 pts/0    S    05:26   0:00 sudo -i
root        3202  0.0  0.7   8840  5672 pts/0    S    05:26   0:00 -bash
root        3727  0.0  0.0      0     0 ?        I    05:55   0:00 [kworker/u2:0-events_unbound]
root        3964  0.0  0.0      0     0 ?        I    05:57   0:01 [kworker/0:0-events]
root        3970  0.0  1.5  20340 11652 ?        Ss   05:58   0:00 /usr/sbin/httpd -DFOREGROUND
apache      3971  0.0  0.9  21676  7448 ?        S    05:58   0:00 /usr/sbin/httpd -DFOREGROUND
apache      3972  0.0  1.4 1079484 11128 ?       Sl   05:58   0:00 /usr/sbin/httpd -DFOREGROUND
apache      3973  0.0  1.9 1210620 15220 ?       Sl   05:58   0:00 /usr/sbin/httpd -DFOREGROUND
apache      3974  0.0  1.4 1079484 11128 ?       Sl   05:58   0:00 /usr/sbin/httpd -DFOREGROUND
root        4208  0.0  0.2   5592  1804 ?        Ss   06:01   0:00 /usr/sbin/anacron -s
root        4222  0.0  0.0      0     0 ?        I<   06:14   0:00 [tls-strp]
root        4228  0.0  0.0      0     0 ?        I    06:14   0:00 [kworker/u2:3]
root        4230  0.0  0.0      0     0 ?        I    06:21   0:00 [kworker/0:1]
root        4234  0.0  0.4  10084  3372 pts/0    R+   06:43   0:00 ps aux
[root@centos9 ~]#
PID 1 is the first process which in new systems is systemd in older Linux systems it's init, but in Ubuntu it's still init. That's the first process in the Linux, and this process is going to start many other processes and will also handle many other child processes as well. The process in a square bracket, for example [migration/0], these are kernel threads. We can see also some normal processes like httpd process : /usr/sbin/httpd -DFOREGROUND, because httpd is running.
Another command, ps -ef, which is going to show all the processes again. But it's going to show you, not the utilization, but the parent process.
[root@centos9 ~]# ps -ef
UID          PID    PPID  C STIME TTY          TIME CMD
root           1       0  0 05:25 ?        00:00:02 /usr/lib/systemd/systemd --switched-root --system --deseria
root           2       0  0 05:25 ?        00:00:00 [kthreadd]
root           3       2  0 05:25 ?        00:00:00 [rcu_gp]
root           4       2  0 05:25 ?        00:00:00 [rcu_par_gp]
root           5       2  0 05:25 ?        00:00:00 [slub_flushwq]
...
root        3970       1  0 05:58 ?        00:00:00 /usr/sbin/httpd -DFOREGROUND
apache      3971    3970  0 05:58 ?        00:00:00 /usr/sbin/httpd -DFOREGROUND
apache      3972    3970  0 05:58 ?        00:00:00 /usr/sbin/httpd -DFOREGROUND
apache      3973    3970  0 05:58 ?        00:00:00 /usr/sbin/httpd -DFOREGROUND
apache      3974    3970  0 05:58 ?        00:00:00 /usr/sbin/httpd -DFOREGROUND
root        4222       2  0 06:14 ?        00:00:00 [tls-strp]
root        4228       2  0 06:14 ?        00:00:00 [kworker/u2:3]
root        4230       2  0 06:21 ?        00:00:00 [kworker/0:1-mm_percpu_wq]
root        4237       2  0 06:45 ?        00:00:00 [kworker/0:2]
root        4239    3202  0 06:49 pts/0    00:00:00 ps -ef
[root@centos9 ~]#
PPID, that is parent process ID, which shows which process started this PID process. For example:
root        3970       1  0 05:58 ?        00:00:00 /usr/sbin/httpd -DFOREGROUND
apache      3971    3970  0 05:58 ?        00:00:00 /usr/sbin/httpd -DFOREGROUND
apache      3972    3970  0 05:58 ?        00:00:00 /usr/sbin/httpd -DFOREGROUND
apache      3973    3970  0 05:58 ?        00:00:00 /usr/sbin/httpd -DFOREGROUND
apache      3974    3970  0 05:58 ?        00:00:00 /usr/sbin/httpd -DFOREGROUND
We can also terminate a process or kill it using kill command :
Let's look for all httpd processes first:
[root@centos9 ~]# ps -ef | grep httpd
root        3970       1  0 05:58 ?        00:00:00 /usr/sbin/httpd -DFOREGROUND
apache      3971    3970  0 05:58 ?        00:00:00 /usr/sbin/httpd -DFOREGROUND
apache      3972    3970  0 05:58 ?        00:00:00 /usr/sbin/httpd -DFOREGROUND
apache      3973    3970  0 05:58 ?        00:00:00 /usr/sbin/httpd -DFOREGROUND
apache      3974    3970  0 05:58 ?        00:00:00 /usr/sbin/httpd -DFOREGROUND
root        4252    3202  0 07:21 pts/0    00:00:00 grep --color=auto httpd
[root@centos9 ~]#
maybe not include grep itself :
[root@centos9 ~]# ps -ef | grep httpd | grep -v 'grep'
root        3970       1  0 05:58 ?        00:00:00 /usr/sbin/httpd -DFOREGROUND
apache      3971    3970  0 05:58 ?        00:00:00 /usr/sbin/httpd -DFOREGROUND
apache      3972    3970  0 05:58 ?        00:00:00 /usr/sbin/httpd -DFOREGROUND
apache      3973    3970  0 05:58 ?        00:00:00 /usr/sbin/httpd -DFOREGROUND
apache      3974    3970  0 05:58 ?        00:00:00 /usr/sbin/httpd -DFOREGROUND
[root@centos9 ~]#
let's use kill command to now:
[root@centos9 ~]# kill 3970
[root@centos9 ~]# ps -ef | grep httpd | grep -v 'grep'
[root@centos9 ~]#
And now we shouldn't see those httpd processes. Kill it might sound harsh, but it's actually more of asking this process, Hey can you please close your operation? So, this process will first close all the child operations, and then it will close itself.
Sometimes processes becomes adamant, they do not listen, and you have to forcefully kill them.
[root@centos9 ~]# systemctl start httpd
[root@centos9 ~]# ps -ef | grep httpd | grep -v 'grep'
root        4273       1  0 07:32 ?        00:00:00 /usr/sbin/httpd -DFOREGROUND
apache      4274    4273  0 07:32 ?        00:00:00 /usr/sbin/httpd -DFOREGROUND
apache      4275    4273  0 07:32 ?        00:00:00 /usr/sbin/httpd -DFOREGROUND
apache      4276    4273  0 07:32 ?        00:00:00 /usr/sbin/httpd -DFOREGROUND
apache      4277    4273  0 07:32 ?        00:00:00 /usr/sbin/httpd -DFOREGROUND
[root@centos9 ~]# kill -9 4273
[root@centos9 ~]# ps -ef | grep httpd | grep -v 'grep'
[root@centos9 ~]#
It's killed parent process with all the child processes. I'm running centOS9, but sometimes especially in older version this might only kill the parent process living the child process as orphans. So there is a better way of using kill with -9 option:
[root@centos9 ~]# systemctl start httpd
[root@centos9 ~]# ps -ef | grep httpd | grep -v 'grep'
root        4502       1  0 07:40 ?        00:00:00 /usr/sbin/httpd -DFOREGROUND
apache      4503    4502  0 07:40 ?        00:00:00 /usr/sbin/httpd -DFOREGROUND
apache      4504    4502  0 07:40 ?        00:00:00 /usr/sbin/httpd -DFOREGROUND
apache      4505    4502  0 07:40 ?        00:00:00 /usr/sbin/httpd -DFOREGROUND
apache      4506    4502  0 07:40 ?        00:00:00 /usr/sbin/httpd -DFOREGROUND
[root@centos9 ~]# ps -ef | grep httpd | grep -v 'grep' | awk '{print$2}'
4502
4503
4504
4505
4506
[root@centos9 ~]# ps -ef | grep httpd | grep -v 'grep' | awk '{print $2}'| xargs kill -9
[root@centos9 ~]# ps -ef | grep httpd | grep -v 'grep'
[root@centos9 ~]#
What I did here in steps:
- start httpd process
- searched for that process
- I used awk to extract PID's from second column of the processes
- xargs will take the PID and provide them to kill -9 command as arguments
Sometimes this is very handy, when there is a lot of orphans child processes left alone, and you want to remove them all, because these processes are adopted by the systemd process, the first process and these are orphan process. Nowadays, the systems are smart. This orphan process will get cleared automatically. But if it does not get cleared, and you have to kill all these processes, this command will come really handy.
A child process that remains running even after its parent process is terminated or completed without waiting for the child process execution is called an Orphan process.
Orphan process will not serve much purpose, but it will still consume the resources. So it's ideal to clear the orphan processes.
11. Archive.
To archive a file we use tar command, let's archive devopsdir/ :
[root@centos9 ~]# ls
anaconda-ks.cfg  info             samplefile.txt
devopsdir        original-ks.cfg  tree-1.8.0-10.el9.x86_64.rpm
[root@centos9 ~]# ls devopsdir/
anaconda-ks.cfg  mybootingfile.cfg
[root@centos9 ~]# tar -czvf devops_05102023.tar.gz devopsdir/
devopsdir/
devopsdir/anaconda-ks.cfg
devopsdir/mybootingfile.cfg
[root@centos9 ~]# ls
anaconda-ks.cfg         devopsdir  original-ks.cfg  tree-1.8.0-10.el9.x86_64.rpm
devops_05102023.tar.gz  info       samplefile.txt
[root@centos9 ~]# file devops_05102023.tar.gz
devops_05102023.tar.gz: gzip compressed data, from Unix, original size modulo 2^32 10240
[root@centos9 ~]#
We can run file command to see that devops_05102023.tar.gz is gun zipped compressed data. Let's see how we can unarchive it, so let's move it to /tmp/ dir and run tar -xzvf and -x is for extraction :
[root@centos9 ~]# mv devops_05102023.tar.gz /tmp/
[root@centos9 ~]# cd /tmp/
[root@centos9 tmp]# ls
devops_05102023.tar.gz
error.log
hsperfdata_root
sysinfo.txt
systemd-private-8a2953906d5b44b780211c3820873dbd-chronyd.service-NXm2Hg
systemd-private-8a2953906d5b44b780211c3820873dbd-dbus-broker.service-3r5kK1
systemd-private-8a2953906d5b44b780211c3820873dbd-httpd.service-QSw0qt
systemd-private-8a2953906d5b44b780211c3820873dbd-kdump.service-aIQN8o
systemd-private-8a2953906d5b44b780211c3820873dbd-systemd-logind.service-w9StUb
[root@centos9 tmp]# tar -xzvf devops_05102023.tar.gz
devopsdir/
devopsdir/anaconda-ks.cfg
devopsdir/mybootingfile.cfg
[root@centos9 tmp]# ls
devops_05102023.tar.gz
devopsdir
error.log
hsperfdata_root
sysinfo.txt
systemd-private-8a2953906d5b44b780211c3820873dbd-chronyd.service-NXm2Hg
systemd-private-8a2953906d5b44b780211c3820873dbd-dbus-broker.service-3r5kK1
systemd-private-8a2953906d5b44b780211c3820873dbd-httpd.service-QSw0qt
systemd-private-8a2953906d5b44b780211c3820873dbd-kdump.service-aIQN8o
systemd-private-8a2953906d5b44b780211c3820873dbd-systemd-logind.service-w9StUb
[root@centos9 tmp]#
If we can extract somewhere else we need add -C option and directory where to extract.
[root@centos9 tmp]# tar -xzvf devops_05102023.tar.gz -C /opt/
devopsdir/
devopsdir/anaconda-ks.cfg
devopsdir/mybootingfile.cfg
[root@centos9 tmp]# ls /opt/
awsservice  dev  devopsdir  VBoxGuestAdditions-6.1.46  webdata
[root@centos9 tmp]#
So, tar is legacy or old archiving command of Linux, and it is still used. There are a lot of options for it. Run it with --help flag to see them all.
[root@centos9 tmp]# tar --help
But much more simpler is a zip command. So let's do the same thing with zip command, zip command might not be available in your system then you need to use yum to install it. So, let's use it:
[root@centos9 ~]# zip -r devops_05102023.zip devopsdir/
  adding: devopsdir/ (stored 0%)
  adding: devopsdir/anaconda-ks.cfg (deflated 50%)
  adding: devopsdir/mybootingfile.cfg (deflated 50%)
[root@centos9 ~]# ls -ltr devops*
-rw-r--r--. 1 root root 2590 Oct  5 14:47 devops_05102023.zip

devopsdir:
total 8
-rw-------. 1 root root 2058 Oct  2 13:52 anaconda-ks.cfg
-rw-------. 1 root root 2058 Oct  2 13:53 mybootingfile.cfg
[root@centos9 ~]#
we can move it to /opt/ and unzip it:
[root@centos9 opt]# ls
awsservice  dev  devops_05102023.zip  VBoxGuestAdditions-6.1.46  webdata
[root@centos9 opt]# unzip devops_05102023.zip
Archive:  devops_05102023.zip
   creating: devopsdir/
  inflating: devopsdir/anaconda-ks.cfg
  inflating: devopsdir/mybootingfile.cfg
[root@centos9 opt]# ls
awsservice  dev  devops_05102023.zip  devopsdir  VBoxGuestAdditions-6.1.46  webdata
[root@centos9 opt]#
So we have two general method for archiving, tar and zip we can use both of them depends on need.
Great, we finally have some basic understanding of Linux Systems. Now we can move to more advanced topics. Coming next Vagrant & Linux Systems.
If you found this blog helpful, and you want to support my work, you can: BuyMeACoffee