

AWS EC2 Instance - Deploy our first Node.js server

Grzegorz Wolfinger
1. Prerequisites: Getting Ready to Deploy Your First Node.js Server on AWS EC2 Instance.
During the development process, many of us, developers, have encountered the need to build a custom API that can be deployed and used in our applications. There are several providers out there that offer server hosting services. After careful consideration, I have personally chosen to utilize Amazon Web Services (AWS) for a multitude of compelling reasons:
- AWS provides an extensive range of services specifically designed to cater to the needs of developers. Their Elastic Compute Cloud (EC2) service, in particular, offers a flexible and scalable infrastructure where we can effortlessly deploy our Node.js server. With EC2, we have full control over the configuration of our server environment, allowing us to optimize its performance and accommodate the varying needs of our application.
- AWS boasts a robust global infrastructure that ensures reliability, availability, and low-latency for our server. By leveraging AWS's data centers located across different regions, we can position our server closer to our target audience, ensuring swift response times and an improved user experience.
- AWS provides numerous tools and services that seamlessly integrate with Node.js, enabling us to enhance our server with various functionalities. We can easily manage our server and monitor its performance using AWS CloudWatch and AWS Elastic Beanstalk. Furthermore, AWS Lambda, their serverless computing solution, allows us to easily scale our server and handle sudden spikes in traffic without worrying about infrastructure management.
- Overall, choosing AWS as our server hosting provider offers us a reliable, scalable, and feature-rich platform to deploy our Node.js server. From robust infrastructure to seamless integrations and excellent support, AWS provides everything we need to ensure the successful deployment and smooth operation of our application.
Sounds great, but how does all of this look in practice? Well, first it would be nice to have an actual Node.js server. Let's start by creating one. Of course, we won't create it from scratch; instead, I'll use one that I've already created. Recently, I started working on a React Native application and I needed to create a custom API for that project. Luckily, I already had previous experience working with Node.js, specifically with Express.js. So, I decided to use these tools to create a REST API that uses CRUD operations to interact with my MongoDB - Node.js server
2. Launching and Configuring an EC2 Instance for Node.js Server Deployment
Let's, login to our AWS account and open the EC2 Dashboard. From there, we can navigate to the Instances section. Here, we can see our familiar instance that we created last time.
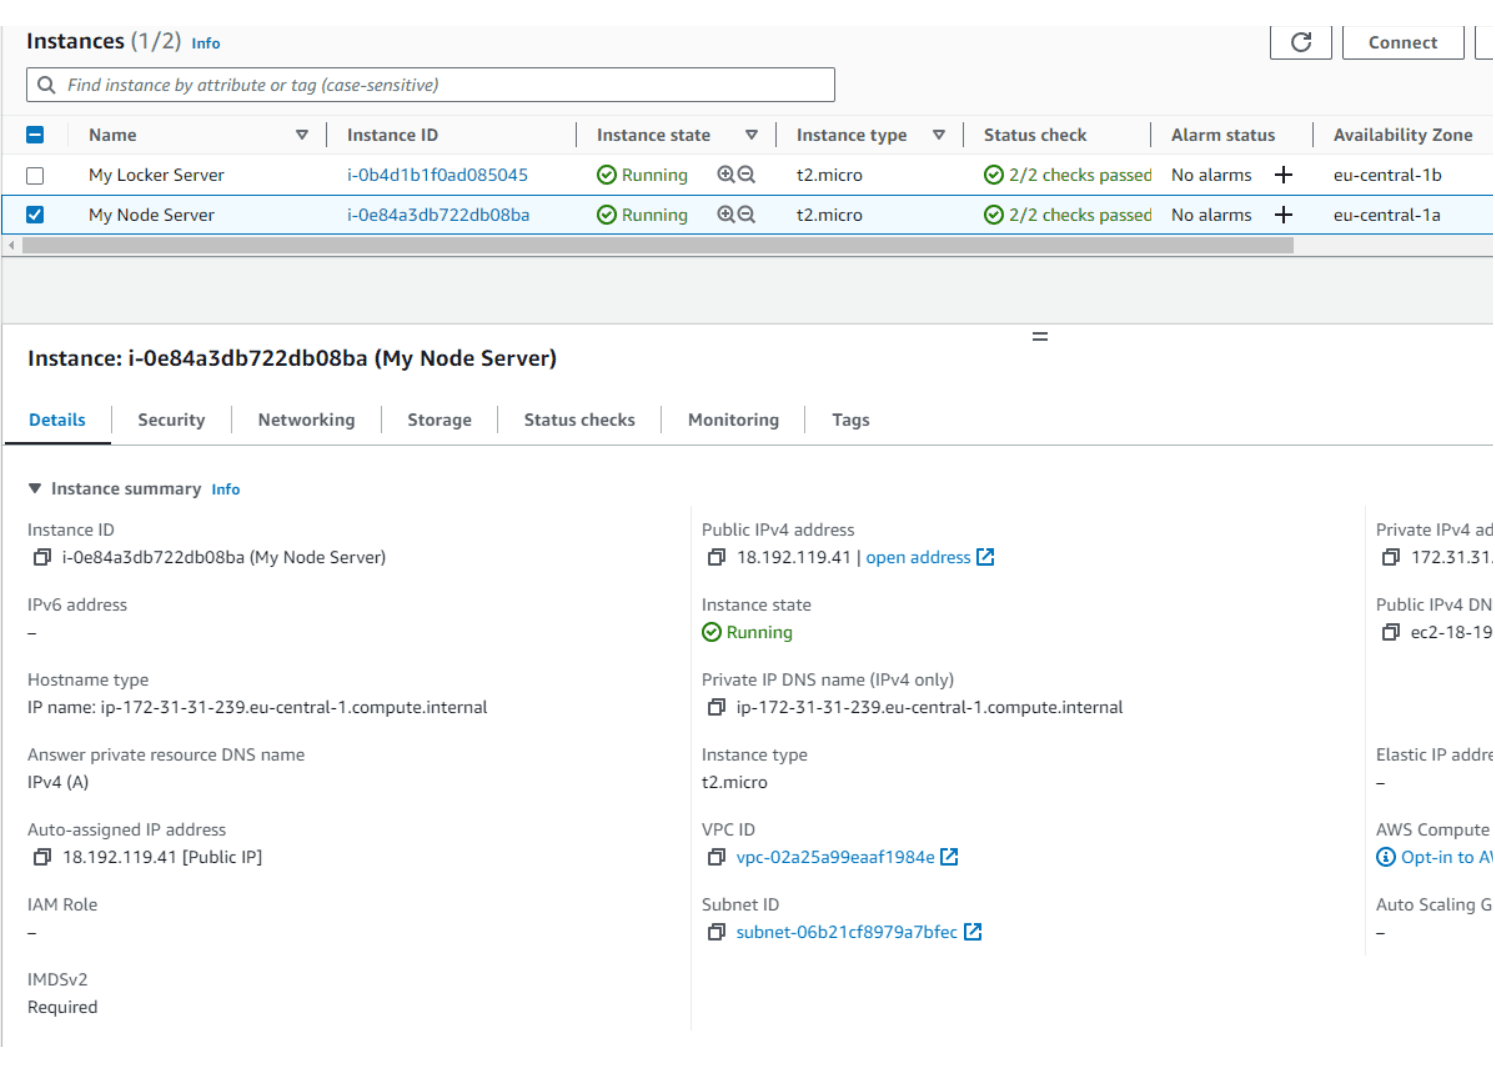
The one that I'm referring to is named 'My Node Server', just make sure that Instance state is 'Running' and the instance is selected then click Connect. Next, new window will open where we can choose
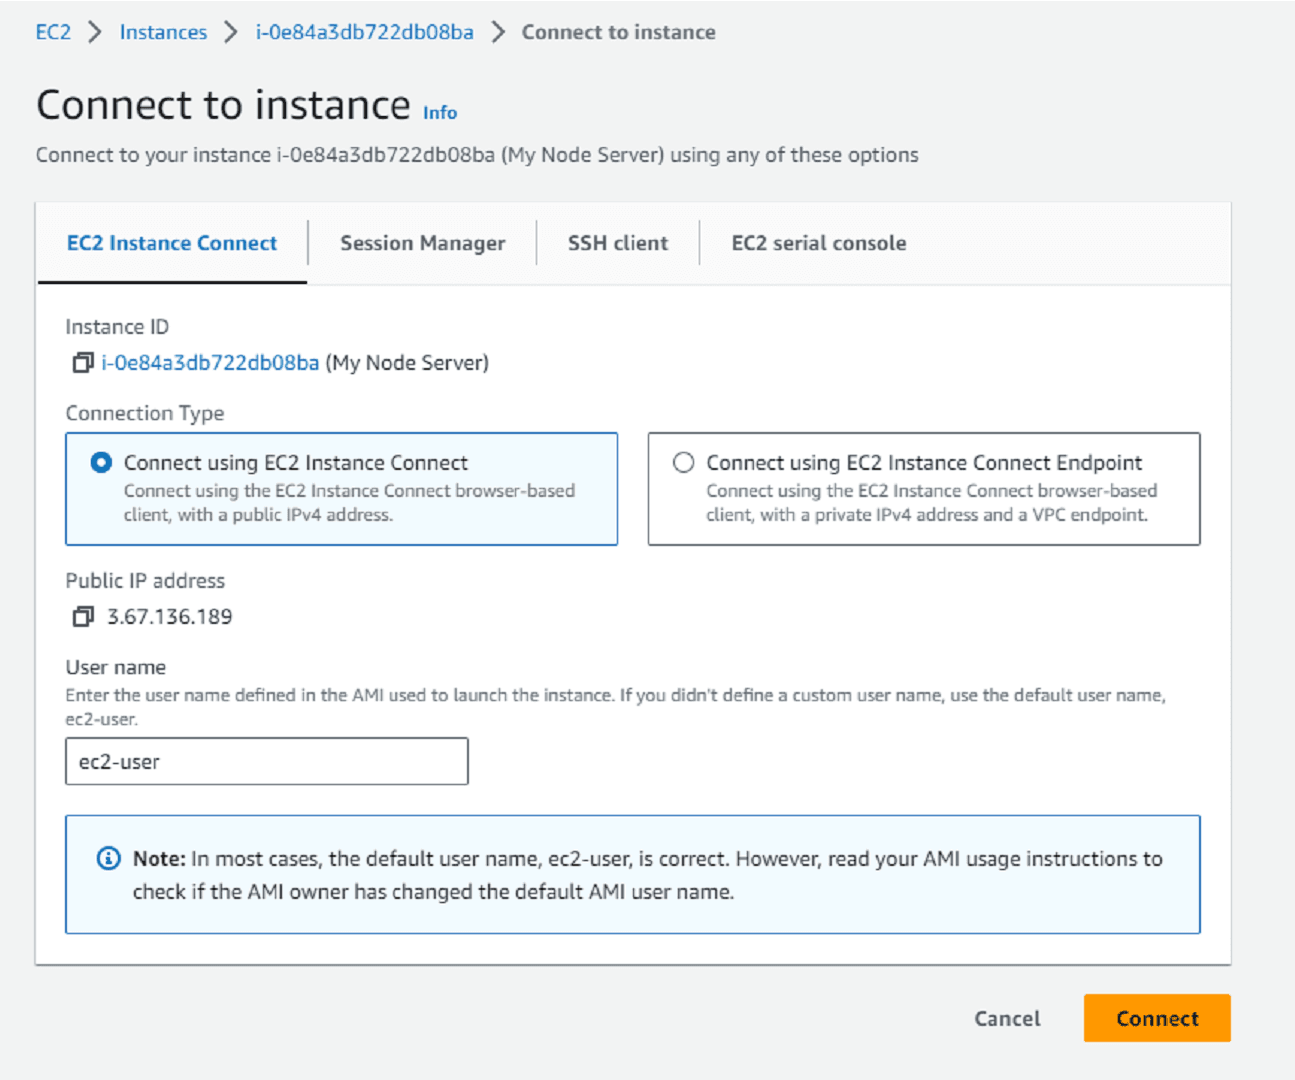
We can connect in few different ways here.
- Connect using the EC2 Instance Connect browser-based client, with a public IPv4 address or with a private IPv4 address and a VPC endpoint.
- Session Manager. To connect to an instance using Session Manager, Systems Manager requires an IAM instance profile.
- SSH client
- EC2 serial console. In order to connect the account must be authorized in the EC2 account settings.
Session Manager and EC2 serial console require more AWS knowledge around IAM instance profiles and authorization.
If you connect to the instance, using an SSH client. First, make sure to create a folder in your user root directory and copy the key pair file that was downloaded to your machine where we're launching our instance. In my case, it's the node-server.perm file inside the .ssh folder. Next, we want to run:
chmod 400 node-server.pem // here name of your file
and then copy example command, just make sure to add valid path to you key pair, in my case it's:
ssh -i "~/.ssh/node-server.pem" ec2-user@ec2-3-67-136-189.eu-central-1.compute.amazonaws.com
You might be asked if you are sure to continue the connection. Just type 'yes', and you should be successfully connected to your instance.
Great! In my case, I want to go back and try one more connection using the default EC2 Instance Connection with the browser-based client. Let's go back to the console, select EC2 Instance Connect, keep the default username as 'ec2-user', and press the Connect button. This should establish a connection with our instance in less than a minute and open new tab.
3. Installing and Setting Up Node.js on Your EC2 Instance
The connection is established we can now install node environment and set up our server. First let's, install Node Version Manager by running in the console terminal:
curl -o- https://raw.githubusercontent.com/nvm-sh/nvm/v0.39.4/install.sh | bash
You can check the latest news and update here: Node Version Manager
Next, activate nvm by running:
. ~/.nvm/nvm.sh
and install node, then check what version you have
nvm install node
node -v
npm -v
I'm running on the latest npm 9.8.0 and node v20.5.0.
4. Deploying Your Node.js Server on AWS EC2: A Step-by-Step Guide
In order to deploy our Node.js server, we need a server, right? So, let's use the server that we created and deployed on GitHub. To use GitHub, we need to install it on our AMI system, which in our case is a Linux system. Let's take care of this first.
Here you can read more about git installation on different platforms and systems. Git Guides
In my case I run :
sudo yum install git -y
I'll quickly run
git -v
and to verify git version and clone my GitHub repo:
git clone https://github.com/wujekbizon/aws-lockers-server.git
Now, before running my server, there's few more things I need to do. I need to set up the .env file because I know that my server relies on Environment Variables. To do that, I will enter my project folder, and I should have a file called .env.example, which on Linux, I can edit with Vim. This file can tell me what variables I need to set up for my project:
MONGODB_USERNAME='<your value here>'
MONGODB_PASSWORD='<your value here>'
NODE_ENV='<your value here>'
PORT='<your value here>'
JWT_EXPIRES_IN='<your value here>'
JWT_SECRET='<your value here>'
Now, I'll create a real .env file and simple run a few commands:
cd <project-name>
touch .env
vim .env // set all Enviorment Variables
// press esc key than
:wq // that will save and exit vim
and install packages
npm install
So now, all set, and we should be good to run command to start the server:
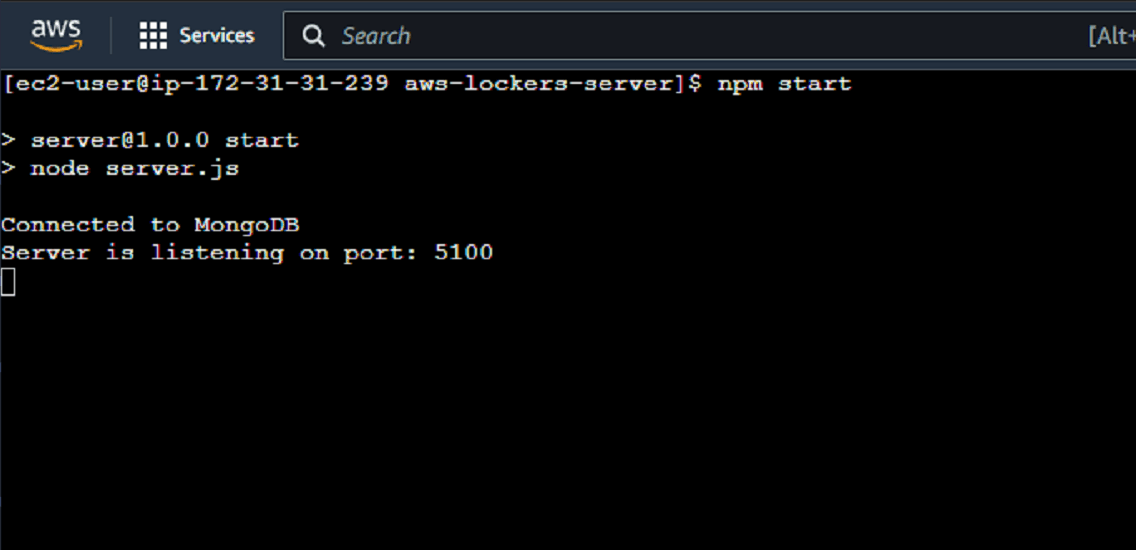
npm start
I can see that I have established a connection to the database and the server are listening on port 5100. How awesome is that? Great!
Let's go back to the tab where we have EC2 dashboard open and see if we can access our server's IPv4 address to check its status. Let's copy the Public IPv4 address and paste it with the port on which our server running on into the browser:
http://3.67.136.189:5100/
And unfortunately, we got this message: 'This site can't be reached'.
What's going on?
Security groups and permissions in Amazon EC2
5. Ensuring Security and Managing Access Controls for Your EC2 Instance
Security groups and permissions in Amazon EC2 are vitally important for several reasons.
Firstly, security groups act as virtual firewalls for your EC2 instances. They control inbound and outbound traffic by specifying which protocols, ports, and IP addresses are allowed or denied access to your instances. By properly configuring security groups, you can restrict network access to your instances, protecting them from unauthorized access and potential attacks from external sources.
Secondly, security groups help in implementing the principle of the least privilege. This means that you only grant the necessary permissions to resources and users in order to perform specific actions. By applying strict and granular security group rules, you can ensure that each EC2 instance only has access to the services, ports, and protocols it requires functioning effectively. This reduces the risk of accidental exposure or potential misuse of resources.
Additionally, security groups provide an additional layer of security by allowing you to define rules based on source IP addresses. This means you can create rules that only allow traffic to come from trusted sources, such as your internal network or specific IP ranges. By limiting access to known and trusted sources, you can further mitigate risks associated with unauthorized access attempts.
Furthermore, EC2 permissions play a crucial role in managing access to your resources. By defining precise permissions using AWS Identity and Access Management (IAM), you can control who has administrative access to your EC2 instances, as well as determining what actions they can perform. This helps enforce the principle of the least privilege and minimizes the chances of accidental or intentional misconfigurations or unauthorized actions.
In conclusion, security groups and permissions in EC2 are important because they help protect your instances from unauthorized access, ensure the principle of the least privilege is followed, provide an additional layer of security with source IP restrictions, and enable granular control over administrative access and actions. By implementing these measures, you can enhance the overall security posture of your EC2 infrastructure.
This is a huge topic to cover, so for right now, let's check what extra permissions we need.
If you remember, when we were launching our instance, we created a security group named 'launch-wizard-2' with some rules. Let's dive deeper into it now. Let's open security groups and click on 'launch-wizard-2' group to open new window
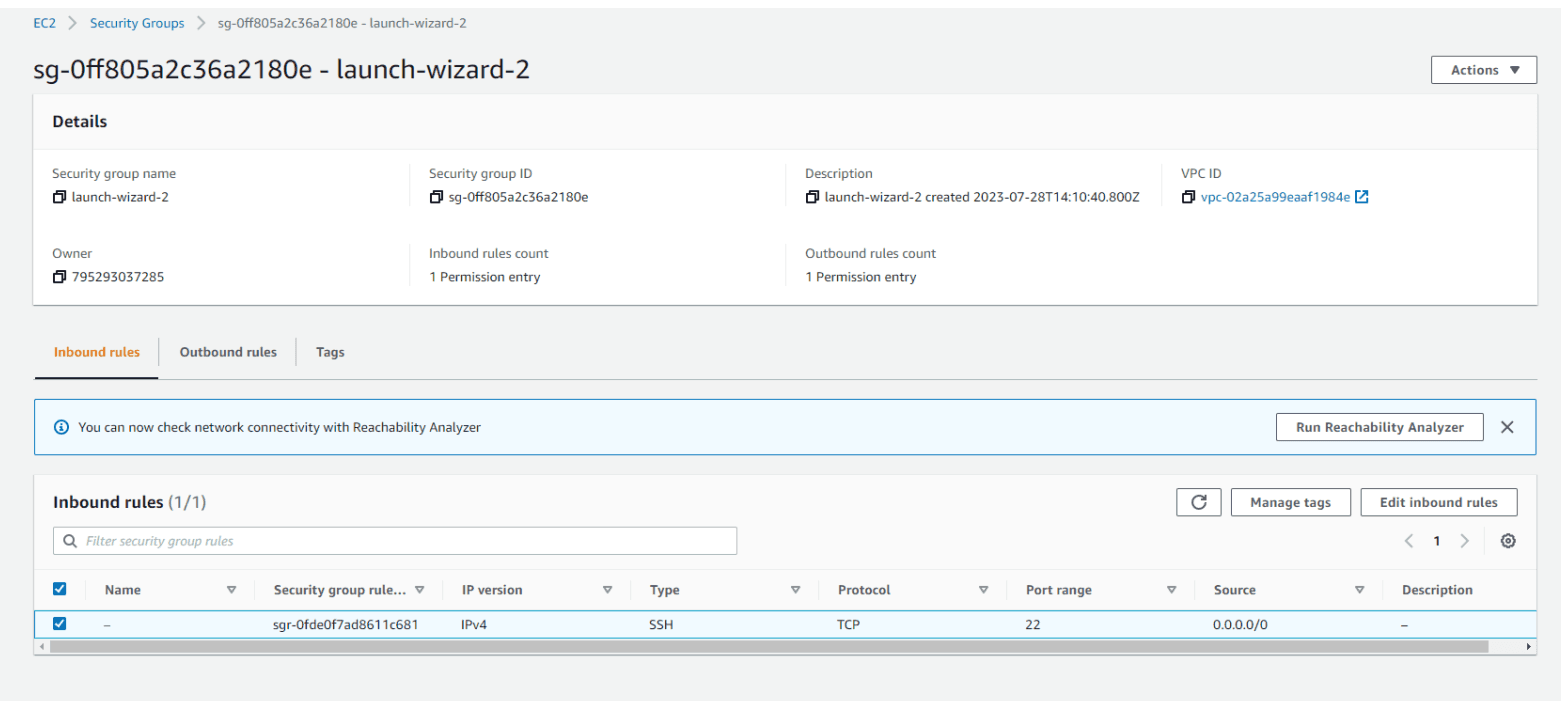
Here, we can find Inbound rules and Outbound rules. We can see that we have 1 permission entry in each. This is the SSH rule that was created by default when we set up our new instance, and it was applied to Port 22. Now, we need to add one more Inbound rule. Let's click on 'Edit inbound rules' and then click on the 'Add rule' button to add a new rule.
Add Custom TCP type rule, Port range 5100 and Source : Anywhere-IPv4
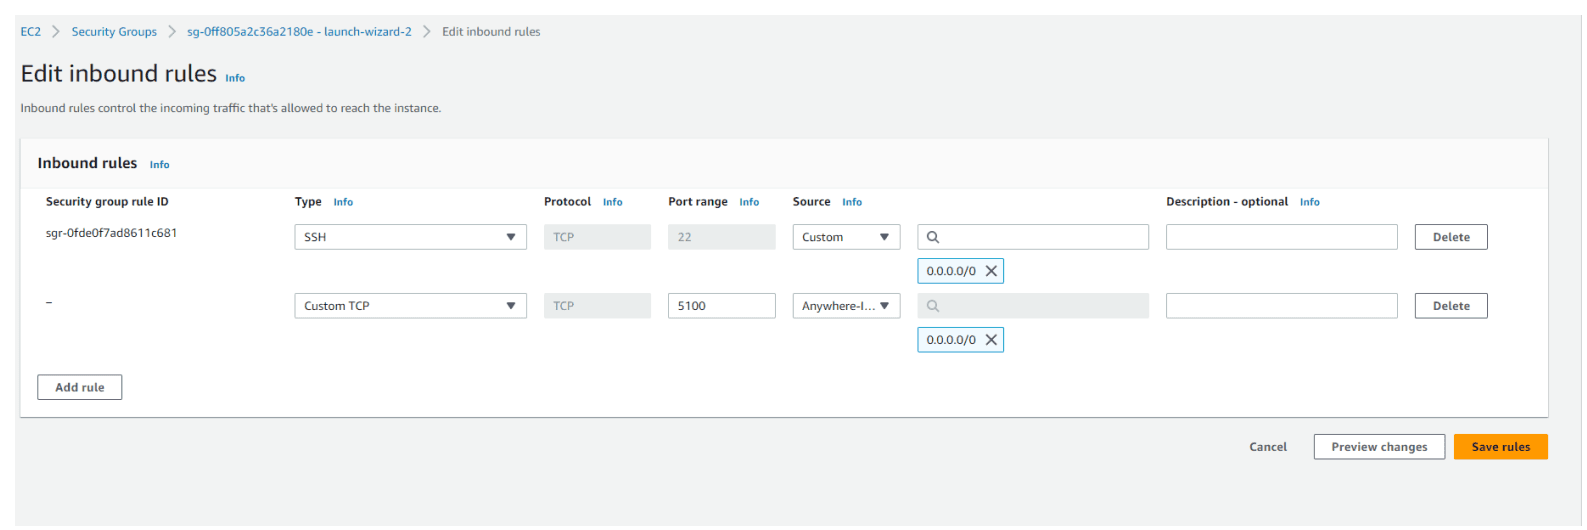
Let's Save rules and try again. This time, we will have a nice JSON response from our server. We can access our server from anywhere, whether it is a public or private network.
{
"message": "Not found"
}
As you can see, providing different rules and setting permissions is crucial for maintaining a secure environment. Specifically, when it comes to EC2 security group rules, proper configuration ensures that network traffic is allowed or denied based on specific protocols, ports, and IP addresses. This level of control helps protect resources, limits potential vulnerabilities, and ensures that only authorized connections are established.
The issue now is that if I close this terminal window or exit the node app in any way, and then go back and try to refresh the page, it can't connect to the server because the server isn't running.
We need a way to always have this node server running, regardless of server restarts or app crashes. To achieve this, we can use something called systemd.
6. Systemd - system and service manager for Linux operating systems.
It is responsible for starting and managing the services, processes, and daemons on a Linux system during boot time and while it is running. It helps maintain the system's state, handles dependencies between services, and provides centralized management and logging capabilities. Systemd is a versatile tool that can accomplish many tasks. However, for our current needs, we are primarily interested in its ability to manage our application as a service. This means it can start the application in the background and ensure that our server remains running even after restarts. Additionally, if our application crashes, systemd can restart it automatically. Therefore, its main responsibility is to ensure the server is always running.
Setting up node.js server as a service with systemd is incredibly easy. First we just need to create a file by run this command:
sudo vim /etc/systemd/system/server.service
Not familiar with Vim?, nope problem : Vim Cheat Sheet
and paste this code snippet
[Unit]
Description=My Node.js server for Lockers API React Native application
After=multi-user.target

[Service]
ExecStart=/home/ec2-user/.nvm/versions/node/v20.5.0/bin/node /home/ec2-user/aws-lockers-server/server.js
Restart=always
RestartSec=10
StandardOutput=syslog
StandardError=syslog
SyslogIdentifier=my-node-server
User=ec2-user
EnvironmentFile=/home/ec2-user/aws-lockers-server/.env

[Install]
WantedBy=multi-user.target
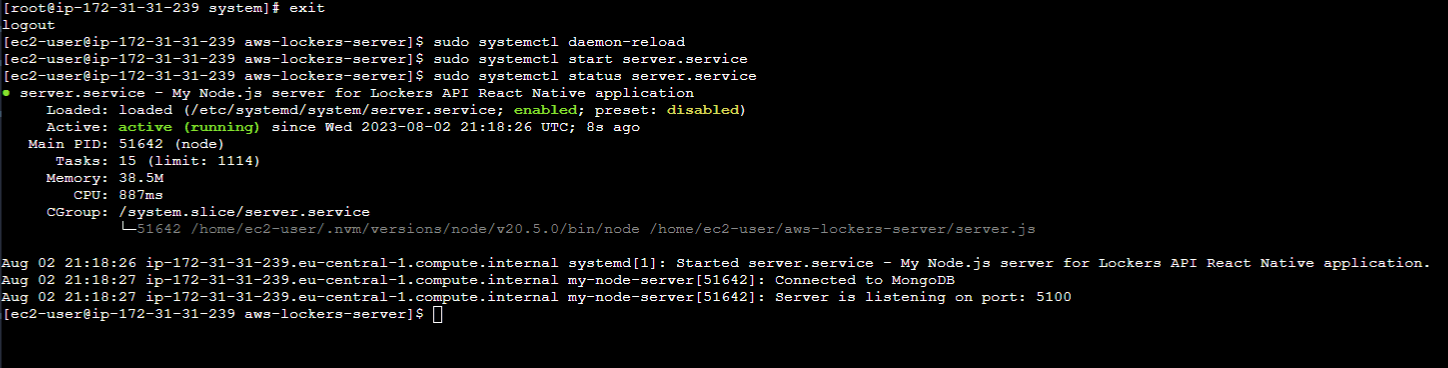
now let's enable and start the service
sudo systemctl enable server.service
sudo systemctl start server.service
Our systemd service is running, so now we can close our EC2 instance window and log out from AWS. However, even if we go to our server's IPv4 address, it will still run.
Right now, I have two instances running with the same Node.js server. This practice is highly recommended by AWS for several reasons:
- Having multiple instances in different regions ensures high availability. If one server fails or experiences issues, the backup instance in another region can seamlessly take over and continue serving the application. This minimizes downtime and ensures that your app remains accessible to users.
- Distributing the workload across multiple instances helps with scalability. As your user base grows or the demands on your application increase, you can easily distribute the load among the instances. This prevents a single server from becoming overwhelmed and ensures optimal performance.
- Having instances in different regions can improve the responsiveness and user experience. By locating instances closer to your users, you can reduce latency and improve the overall performance of your application.
So, running two or more instances with the same app in different regions provides high availability, scalability, and improved user experience. It is considered a good practice by AWS to ensure uninterrupted service and efficient performance.
7. Summary - Navigating AWS EC2 with Confidence
And there you have it! We've reached the end of this epic AWS EC2 adventure. With your newfound knowledge, you can confidently launch instances, connect to them like a pro, and even deploy your very own Node.js server on an EC2 instance. Remember, as you navigate the vast cloud environment, always keep your instance close and your SSH keys closer. AWS EC2 is like a magical playground where you can conjure up servers and spin them like a DJ spins records. So go forth, my friend, and let your creativity soar! Whether you're hosting a website, building a powerful application, or just having some EC2 fun, AWS has got your back. So keep exploring, keep launching, and keep being an EC2 master. Thank you for accompanying me on this AWS EC2 journey. Until we meet again, may your instances stay available, your server responses stay lightning fast, and your cloud dreams turn into reality! Happy cloud computing! 🚀
Stay tuned, for more AWS content coming soon!
If you found this blog helpful, and you want to support my work, you can: BuyMeACoffee